|
| |
Chapter 4 The Reactis for C Top-Level Window
The next several chapters of this manual contain detailed
descriptions of different components of Reactis for C. This
chapter concentrates on the functionality available in the top-level
window when Simulator is turned off, or disabled. Simulator
is disabled when Reactis for C is first invoked; it may also be explicitly
turned off by clicking button
 (window
item 11 in Figure 4.1).
Clicking button
(window
item 11 in Figure 4.1).
Clicking button
 (window
item 12) turns Simulator on; the functionality of the Simulator-on
mode is described in Chapter 8.
(window
item 12) turns Simulator on; the functionality of the Simulator-on
mode is described in Chapter 8.
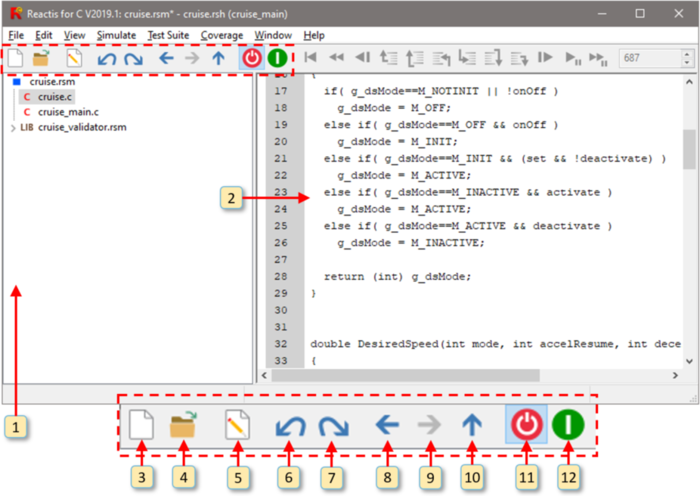
4.1 Labeled Window Items
An annotated screen shot of the Reactis for C top-level window may be found in Figure 4.1. This section describes the functionality of the numbered items in this figure, while the section following discusses the workings of the pull-down menus.
The numbers below refer to the labels in Figure 4.1.
- The hierarchy panel shows the C files in the project and how
they are related. Clicking on the
 to the left of an
item expands the tree to display the subcomponents of the item.
Clicking on the
to the left of an
item expands the tree to display the subcomponents of the item.
Clicking on the
 to the left of an item shrinks the
tree by hiding the subcompoents of the item.
Clicking on the name of a file displays
the file contents in the main panel (window
item 2). Pressing the [F2] key causes the
parent of the currently displayed item to be displayed.
to the left of an item shrinks the
tree by hiding the subcompoents of the item.
Clicking on the name of a file displays
the file contents in the main panel (window
item 2). Pressing the [F2] key causes the
parent of the currently displayed item to be displayed.Right-clicking on an item in the hierarchy panel opens a pop-up menu from which the item can be edited. Note that editing is only allowed when Simulator is disabled.
-
The main panel displays the currently selected C code or build file. You
may interact with the main panel
in a number of different ways using the mouse including hovering,
double-clicking on items, or right-clicking
in various parts of the panel. Some operations in the
main panel are only available when Simulator is enabled (see
Chapter 8 for a description of those operations).
The following mouse operations are available when Simulator is disabled:
- When a build file is displayed in the main panel, clicking...
- on the Edit link in the project heading will open the Reactis Build File Editor to modify the .h file which defines the project.
- on a C file name will display the file contents in the main panel.
- on the Edit link next to a file name will open the file in the editor of your choice. See Section 4.3.1 for instructions on how to specify which editor to use.
- When a C source files is displayed in the main panel, left-clicking...
- on the line number of a line of instrumentation code will select the line for subsequent cut or copy operations. See Section 10.3.5 for more details.
- When a C source files is displayed in the main panel, right-clicking...
- on a line number will open a pop-up menu which lists options for adding and editing instrumentation code. See Section 10.3.4 for more details.
One final note: pressing the [F2] key within this panel causes the parent of the currently displayed item to be displayed.
- Create a new Reactis build file.
- Open an existing Reactis build file.
- Edit the currently selected Reactis build file or C file.
- Undo the most recent change to the instrumentation code.
- Redo the most recent change to the instrumentation code.
- Go back in the history of displayed items.
- Go forward in the history of displayed items.
- Display the parent of the currently displayed item.
- Disable Simulator.
- Enable Simulator.
4.2 Menus
Some of the top-level menu items are described here; the rest are discussed in Chapter 8, which is devoted to Reactis Simulator.
Some menu entries also have keyboard shortcuts that enable the relevant operations to be invoked from the keyboard. These shortcuts are displayed to the right of the relevant entries in the menus.
- File.
- The file menu contains the following entries.
- New Build File...
- Create a new build file.
- Open Build File...
- Load an existing build file into Reactis for C.
- Save Instrumentation Code...
- Save all instrumentation code (in the corresponding build file).
- Save Build File As...
- Rename and save the current build file.
- Close Build File.
- Close the currently loaded build file.
- Reload Build File.
- Reload the currently loaded project.
- New Harness Library...
- Create a new harness library.
- Open Harness Library...
- Load an existing harness library.
- Extract Harness Library...
- Extract an .rsh file from an .rtp file . Reactis for C Tester may be configured to store launch parameters and the .rsh file used for a given run in a Reactis Tester Parameter file (.rtp file). Selecting this menu item retrieves the .rsh file from the .rtp file.
- Save Harness Library.
- Save the current .rsh file.
- Save Harness Library As...
- Rename and save the current .rsh file.
- Global Settings...
- Opens dialog to adjust Reactis for C global settings. Section 4.3 describes the use of this dialog.
- Default Harness Library Settings...
-
Opens a dialog to specify the default settings to be used when
creating a new .rsh file. The dialog includes settings which specify:
- how a program executes (e.g. promotion of float values to double),
- error checking (e.g. flagging overflows or NaN values),
- coverage settings that specify which coverage metrics are used and how the coverage metrics are configured (e.g. the criteria for determining when an expression is a decision),
Whenever a new .rsh file is created, the initial settings match the default values. These settings can be changed via the Reactis Harness Editor. See Section 4.4 for more details on the Default Harness Library Settings dialog.
- Exit Reactis for C.
- Stop Reactis for C.
- Edit.
-
This menu includes entries used to manipulate .rsm files and .rsh files. Note that these files may be modified only when Simulator is disabled. Therefore, when Simulator is enabled the information may be viewed but not changed. The Reactis Harness Editor is described in more detail in Chapter 6.
- Build File...
- Open the Reactis Build File Editor.
- Find...
- Launches a text search of the C files comprising your project. If a C file is currently displayed in the main panel, then only that C file will be searched. If an .rsm file is displayed in the main panel, then all C files named in the build file as well as those in any libraries referenced will be searched.
- New Harness...
- Create a new harness in the currently loaded harness library.
- General...
- View or modify basic properties of the current harness.
- Inputs...
- Constrain the values arriving at inputs.
- Outputs...
- Specify the set of outputs.
- Configuration Variables...
- Manipulate configuration variables, global variables that may change in between tests but not during a test.
- Error Checking...
- Specify the set of error checks Reactis will employ (e.g. flagging overflows or NaN values).
- Coverage Metrics...
-
Specify the set of coverage metrics to be used
when working with the current harness library. When a metric is disabled:
- the metric will not be targeted by Tester when generating tests, and
- Simulator will not include the targets from the criterion in the Coverage Summary dialog, the Coverage Report Browser, and the highlighting in the main panel.
- Excluded Coverage Targets...
- View and/or modify the set of coverage targets which have been excluded from coverage tracking. When a target is excluded from coverage, it will not be targeted by Tester when generating tests, and Simulator will not include the target in the Coverage Summary dialog or the Coverage Report Browser. Targets which have been excluded from coverage are colored blue in the main panel.
- Undo
- Undo the most recent change to the instrumentation code.
- Redo
- Redo the most recently undone change to the instrumentation code.
- Cut
- Copy the currently selected lines of instrumentation code to the clipboard and then delete them.
- Copy
- Copy the currently selected lines of instrumentation code to the clipboard.
- Paste
- Replace the currently selected lines of instrumentation code with the contents of the clipboard.
- View.
- The following are the menu entries that are enabled when
Simulator is disabled. The other elements of the menu are only enabled
when Simulator is enabled. See Section 8.2
for descriptions of these items.
- Back.
- Go back in the history of what is displayed in the main panel.
- Forward.
- Go forward in the history of what is displayed in the main panel.
- Go to Parent.
- Cause the parent of the currently displayed item to be displayed in the main panel.
- Expand Tree.
- Causes the entire tree in the hierarchy panel to be expanded.
- Collapse Tree.
- Causes the entire tree in the hierarchy panel to be collapsed.
- Select C Source Font...
- Select font for displaying C source code in the main panel.
- Show Recent Errors...
- Display recent error messages encountered for the current project.
- Clear Recent Errors.
- Remove all entries from the list of recent errors.
- Simulate.
- Only one menu entry is enabled when Simulator is disabled, and it is described below. The remaining elements of the menu are only enabled when Simulator is enabled, and are described in Section 8.2.
- Test Suite.
- The following menu entries are enabled when Simulator is disabled. The remaining elements of the menu are only enabled when Simulator is enabled, and are described in Section 8.2.
- Coverage.
- No items are enabled when Simulator is disabled.
- Window.
- Used to switch between projects currently loaded in Reactis for C.
- Help.
- The Help menu offers the following choices:
- Contents.
- Go to the table of contents in the in-tool documentation.
- Index.
- Go to the index in the in-tool documentation.
- Frequently Asked Questions.
- Go to the Frequently Asked Questions section of the in-tool documentation.
- Release Notes.
- Display the release notes for the current Reactis for C version.
- Top Level.
- Go to the section of the in-tool documentation that describes the Reactis top-level window.
- Check for Updates...
- Check the Reactive Systems website for a version of Reactis for C more recent than than the currently executing version.
- About.
- Open a dialog displaying the Reactis for C version and other configuration information. The dialog includes a Copy To Clipboard button to transfer the information to the Windows Clipboard. When requesting assistance, sending this information to Reactive Systems via email often facilitates the efficient delivery of support.
4.3 Reactis Global Settings
Selecting File -> Global Settings... opens the Reactis for C Global Settings dialog, from which the behavior of Reactis for C can be adjusted. The settings are partitioned into four groups: General, C Code, User Info, and License. Each group is displayed in a separate tabbed pane as described below.
4.3.1 General Settings
The General settings tab shown in Figure 4.2 includes the following items.
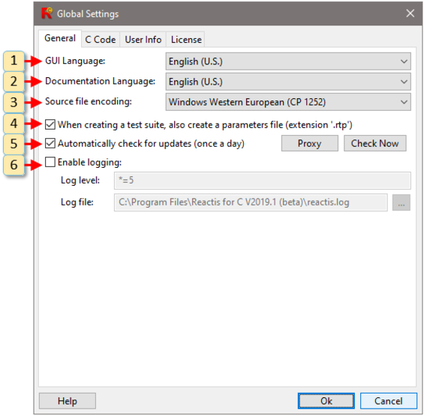
- 1. GUI Language.
- Language used in the Reactis for C GUI.
- 2. Documentation Language.
- Language used in the Reactis for C documentation.
- 3. Source file encoding.
- Character set encoding used by source files.
- 4. When creating a test suite, also create a parameters file (extension .rtp).
-
Instructs Reactis Tester to store launch parameters and
the .rsh file used for a given run in a Reactis Tester
Parameter file (.rtp file ). Subsequently:
- the .rsh file may be extracted from the .rtp file by selecting File -> Extract Harness Library...;
- the Tester parameters may be loaded into the Tester launch dialog by clicking the Load button.
- 5. Automatically check for updates (once a day).
- Instructs Reactis for C to check once per day whether updates to Reactis for C are available for download. If updates are found you will be asked if you would like to download and install the patch. To the right of this check box, the Proxy button summons a dialog from which a proxy server for Reactis updates is specified, and the Check Now button performs an immediate check for updates. Note: this feature can be disabled at install time; in which case this check box, the Proxy button, and Check Now button will not appear in the dialog.
- 6. Enable logging.
- Enables logging, specify a log level, and indicate the file to which the log should be written. Note that logging degrades performance and can create very large log files; therefore, it is typically only used to diagnose problems. The log level string will by provided by the Reactis support team if you are asked to create a log file.
4.3.2 C Code
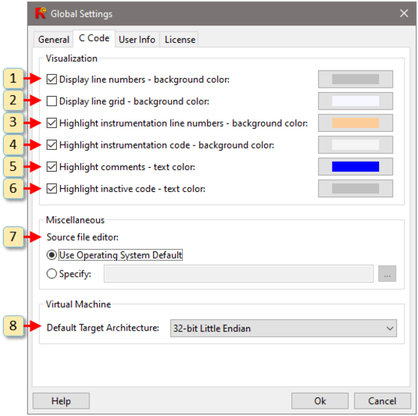
Figure 4.3 shows the C Code tab of the Reactis for C settings dialog. The numbered items in this figure configure the behavior of Reactis for C as follows:
- Display line numbers. Toggle the display of line numbers in the main Reactis panel when displaying C source files. The Background Color button allows you to select the background color of screen region where the line numbers are displayed.
- Display line grid. Toggle the highlighting of every other line with a contrasting background color. The Background Color button allows you to select which color is used.
- Highlight instrumentation line numbers. Enables the highlighting of the line numbers of source code lines which contain instrumentation code with a contrasting background color. The Text Color button allows you to select which color is used.
- Highlight instrumentation code. Toggle the highlighting of source lines which contain instrumentation code with a contrasting background color. The Text Color button allows you to select which color is used.
- Highlight comments. Toggle the highlighting of comments in the source code with a contrasting text color. The Text Color button allows you to select which color is used.
- Highlight inactive code.
Toggle the highlighting of
code which was disabled by a conditional compilation directive
such as
#ifdefwith a contrasting text color. The Text Color button allows you to select which color is used. - Source File Editor. The editor which will be used to edit C source files.
- Default Target Architecture. The default architecture to be used when executing C code. Possible values are 32-Bit Little Endian or 32-Bit Big Endian. See Section 5.7 for details.
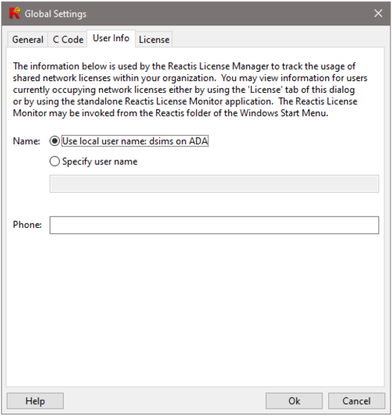
4.3.3 User Info Settings
The User Info settings tab is shown in Figure 4.4. When Reactis for C is configured to use a remote license server as described in the next section, info contained in this panel is submitted to the server when Reactis for C is started, and available to all users who have access to the server.
The list of users occupying licenses at a given time may be obtained using the License tab of the Global Settings dialog as described below, or using the standalone License Monitor utility included in the Reactis for C distribution. This utility may be invoked by selecting Reactis for C V2020 -> License Manager -> License Monitor from the Windows Start menu.
4.3.4 License Settings
The License tab is shown in Figure 4.5 and enables you to query and specify license configuration information. The first two sections display the MAC address of the machine on which Reactis is running and the location of a local license file if one is in use.
The third section of the tab displays a list of servers running the Reactis License Manager. When Reactis is invoked, this list will be searched from top to bottom for an available license. The lower portion of the tab displays information for each License Manager in the list. This information includes the status of the License Manager, the total number of licenses, the number of licenses currently being used, the IP addresses currently occupying licenses, and any info (names, phone numbers) available for users actually using the licenses.
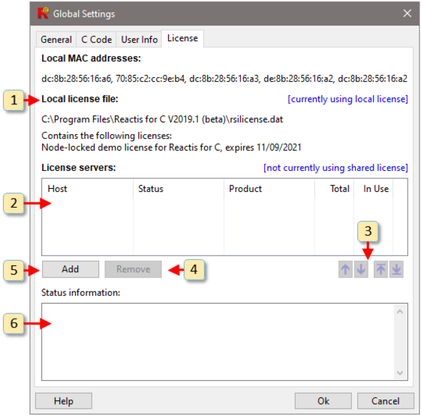
Each of the window items labeled in Figure 4.5 is interpreted and used as follows.
- Information about the contents of the local license file. If there is a problem with the license file, then a description of the error condition is listed here. If no problem exists, then a list of licensed products and their expiration dates is given.
- This is the list of servers running the Reactis License Manager.
Each entry in the list includes the following:
- Host.
- The name or IP address of the server running the License Manager.
- Status.
- The status of the connection to the License Manager.
- Product.
- Name of the product (Reactis, Reactis for C Plugin, Reactis Model Inspector or Reactis for C).
- Total.
- The total number of licenses for the product.
- In Use.
- The number of currently occupied licenses for the product.
- Move the currently selected License Manager up one spot in the list, down one spot in the list, to the top of the list, or to the bottom of the list.
- Remove the currently selected License Manager from the list.
- Add a new License Manager to the list.
- Information regarding the currently selected License Manager is displayed
here. If there is a problem with the connection to the License Manager,
then a description of the error condition is listed here. If no problem
exists, then for each license currently occupied, this section lists:
- IP Address.
- The IP address of the computer on which the Reactis application occupying the license is running.
- Name.
- The contents of the Name field in the User Info settings tab of the person occupying the license.
- Phone.
- The contents of the Phone field in the User Info settings tab of the person occupying the license.
- Duration.
- The length of the time this computer has been holding the license.
4.4 Default Harness Library Settings
The Default Harness Library Settings dialog lets you specify default settings to be used when creating new .rsh files. Whenever a new .rsh file is created, these settings are imported into the new .rsh file. Subsequently the settings for a harness library are modified using the Reactis Harness Editor. The dialog includes the following tabbed panes:
- General
- settings which control how a program is executed.
- Error Checking
- settings which specify when errors should be flagged (overflows, NaN values, etc.)
- Coverage
- settings that specify which coverage metrics are collected for a program under test and how the coverage metrics are configured.
See Chapter 6 for a description of each setting.