|
| |
Chapter 5 The Reactis Build File Editor
Reactis for C requires the C source files that implement a program as well as the source files for any libraries referenced by the program. The mechanism for listing these C source files is described in the rest of this section.
The collection of C source files that implement an program is specified using a Reactis Build File (.rsm file 1), which is created and modified using the editor shown in Figure 5.1. An .rsm file specifies how Reactis for C should compile a program for testing. Additionally, a separate .rsm file is required for each library referenced by a program. The .rsm files for the program and any libraries referenced by the program are defined in the same way. In the following discussion we denote the program/library compiled from an .rsm file as the library under construction (LUC).
5.1 Common Buttons
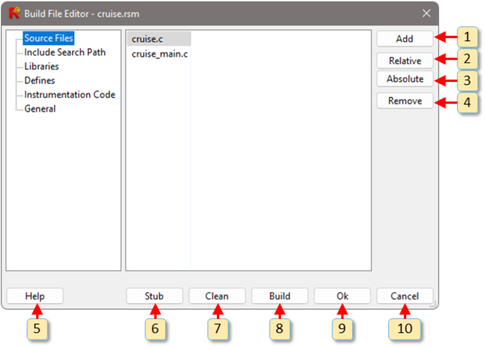
The .rsm file editor has 5 buttons which are always enabled regardless of which pane is selected. These buttons are labeled 5-9 in Figure 5.1, and are used as follows:
- Help. Open the help dialog.
- Stub. Generate stub source code for missing functions and variables. See Section 5.8 for details.
- Clean. Delete files containing compiled code which were created when the LUC was built.
- Build. Build the LUC.
- Ok. Close the .rsm file editor and save any pending modifications.
- Cancel. Close the .rsm file editor without saving any pending modifications.
5.2 Item Selection
Four of the Reactis Build File Editor panes contain lists of items, such as source files or directories. Within each of these panes, a item listed within the pane can be selected by left-clicking on the line containing the item. Selected items are distinguished by a blue background. A contiguous group of multiple items can be selected by left-clicking on the first item in the sequence and then holding down the shift button while left-clicking on the last item in the sequence. This will select the two items clicked-on plus all items appearing between them. A non-contiguous group of items can be selected by left-clicking on the first item and then holding down the control (Ctrl) key while left-clicking on subsequent items.
5.3 Sources
Figure 5.1 shows the Source Files pane of the Build File Editor, which lists the C source files which implement the LUC. The contents of this pane are modified using the buttons labeled 1-4 in Figure 5.1:
- Add. Add one or more source files to the LUC.
- Relative. Convert all currently selected source files to relative path format.
- Absolute. Convert all currently selected source files to absolute path format.
- Remove. Remove all currently selected source files from the LUC.
See Section 5.9 for an explanation of relative and absolute pathnames. See Section 5.2 for an explanation of how source files within the Source Files pane are selected.
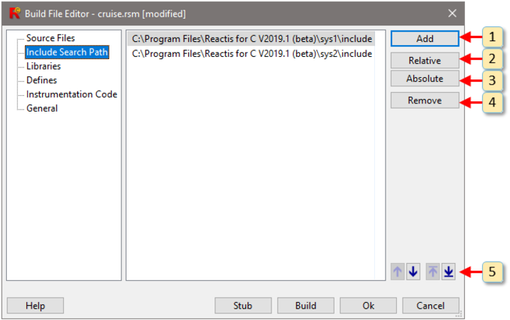
5.4 Include Search Path
Figure 5.2 shows the Include Search Path
pane of the .rsm file editor,
which lists the directories to be searched when processing a #include
directive. The list is searched from top to bottom when
processing a #include directive.
The labeled items in Figure 5.2 are used as follows:
- Add. Add one or more directories to the search path for the LUC. When Add is clicked, a dialog will appear in which you can either enter the name a directory directly or browse the file-system for a directory. In addition to the directory name, the dialog contains a check-box labeled Recursively add all subdirectories. If this box is not checked, then only the selected directory will be added to the search list. If Recursively add all subdirectories is checked, then, in addition to the directory itself, all directories contained within the directory will be added, as well as all the subdirectories of those directories, and so on, until every directory underneath the chosen directory has been added.
- Relative. Convert all currently selected directories to relative path format. Relative pathnames are explained in Section 5.9. Directory selection is explained in Section 5.2.
- Absolute. Convert all currently selected directories to absolute path format. Absolute pathnames are explained in Section 5.9. Directory selection is explained in Section 5.2.
- Remove. Removes all currently selected directories from the search path. Directory selection is explained in Section 5.2.
- These buttons are used to reorder the search list:
-

- Move the selected directories up 1 position within the search list.
-

- Move the selected directories down 1 position within the search list.
-

- Move the selected directories to the start of the search list.
-

- Move the selected directories to the end of the search list.
-
See Section 5.9 for an explanation of relative and absolute pathnames. See Section 5.2 for an explanation of how directories within the Include Search Path pane are selected.
5.5 Libraries
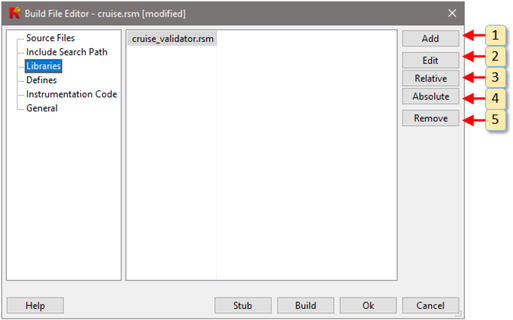
Figure 5.3 shows the Libraries pane of the Build File Editor, which lists the libraries used by the LUC. The labeled items in Figure 5.3 are used as follows:
- Add. Add one or more libraries to the LUC. A library is referenced via the .rsm file used to build the library.
- Edit. Open the currently selected library in a new instance of the .rsm file editor. The current editor instance is suspended until the new instance of the editor is closed.
- Relative. Convert all currently selected libraries to relative path format.
- Absolute. Convert all currently selected libraries to absolute path format.
- Remove. Removes all currently selected libraries from the LUC.
See Section 5.9 for an explanation of relative and absolute pathnames. See Section 5.2 for an explanation of how libraries within the Libraries pane are selected.
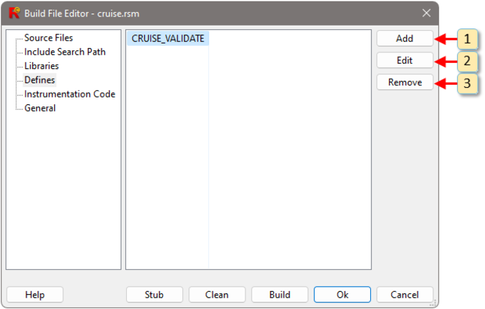
5.6 Defines
Figure 5.4 shows the Defines pane of the Build File Editor, which lists the macro definitions which are to be defined at the start of compilation of the LUC. Macros are defined using expressions of the form:
- name=value, in which case instances of the identifier name will be replaced by value during preprocessing, or
- name, in which case name will be replaced by
the literal
1during preprocessing.
There is no mechanism
provided to define macros which accept arguments or use macro
operators such as stringification or token catenation.
This is similar to the way the
-D option works on most C compilers.
The labeled items in Figure 5.4 are used as follows:
- Add. This button is used to add one or more macro definitions to the LUC.
- Edit. This button opens a editor from which the currently selected macro definition can be changed.
- Remove. This button removes all currently selected macro definitions from the LUC.
See Section 5.2 for an explanation of how macro definitions within the Defines pane are selected.
5.6.1 Instrumentation Code
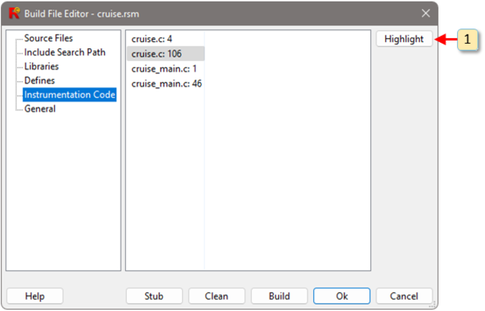
Figure 5.5 shows the Instrumentation Code pane of the Build File Editor. This pane lists the location of every segment of instrumentation code that is stored within the build file. Instrumentation code whose location needs to be verified are highlighted with red text. Double clicking on any location within the pane causes the corresponding instrumentation code to be displayed in the main window and highlighted with a yellow flashing background for a few seconds.
The labeled items in Figure 5.4 are used as follows:
- Highlight. The button displays the currently selected instrumentation code in the main window and highlights it with a yellow flashing background for a few seconds. Highlighting can also be done by double-clicking on the location in the Instrumentation Code panel.
5.6.2 General
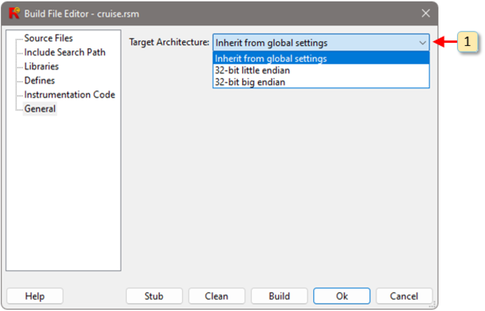
Figure 5.6 shows the General pane of the Build File Editor. The labeled item in Figure 5.6 is used as follows:
-
Target Architecture. This drop-down menu
specifies the VM architecture on which the LUC will execute.
The possible choices are:
- Inherit from Global Settings
- Use the global default architecture (see Section 4.3.2). This choice is only available for a top-level .rsm file.
- Inherit from Parent .rsm File
- Use the architecture selected by the parent of this .rsm file. This choice is only available for a library .rsm file.
- 32-Bit Big Endian
- Use the 32-bit big endian architecture.
- 32-Bit Little Endian
- Use the 32-bit little endian architecture.
5.7 Target Architecture
In Reactis for C, C code is compiled and executed on a virtual machine (VM). There are two choices for VM architecture:
- 32-bit word and pointer size with little endian byte order.
- 32-bit word and pointer size with big endian byte order.
In versions of Reactis for C prior to V2020, only the first choice (32-bit little endian) was available. The salient features of this VM are identical to the IA-32 (Intel/32-bit) architecture. When a word is stored in memory, the bytes are stored from least to most significant. For example, when the word 1025 is stored in memory, bytes will be stored in the order 1, 4, 0, 0.
The other architecture choice is 32-bit big endian. This architecture has the same word and pointer size, but uses a big endian byte order. Under this architecture, when a word is stored in memory, the bytes are stored from most to least significant. For example, when the word 1025 is stored in memory, bytes will be stored in the order 0, 0, 4, 1.
For most programs the byte order should not any difference. Byte order only affects the behavior of programs which use unions or pointers to access the individual bytes of a stored value. Math operations and bit-level operations are not affected by the byte order.
Note that all code is executed on the same VM, so the target architecture selected for components of the program under test must LUC must match the target architecture of all the other system components. Changing the target architecture will require the LUC to be rebuilt before the change will take effect.
5.8 Generating Stubs
The Stub button (item 7 in Figure 5.1) generates a source file which contains definitions for global variables and functions which are declared in the code, but are not defined.
A variable is defined if an instance of the variable exists which does not include
the extern keyword.
A function is defined if an instance with a body containing the code for that function exists.
In the generated source file, all variables are initialized to numeric zero
(0 for integers, 0.0 for floats, structure fields are individually initialized to numeric zero),
and all functions ignore their arguments and return a value of zero (using the same rules as variables).
The generated source file may require manual editing before it will compile, particularly
if complex types or typedefs are used. In particular, #include directives may need to be
added to the top of the source file.
Also note, that, if you want to stub missing variables with an initial value of zero and stub missing functions with functions that return zero, then it is easier to open the Error Checking pane of the Reactis Harness Editor and set When an extern variable is undefined to Initialize to zero and When an undefined function is called to Return zero. See Section 6.11 for details.
5.9 Pathnames
The path to a source file or directory can be either relative or absolute. The location of a source file whose path is relative is determined by appending the relative path to the directory containing the .rsm file. For example, if the .rsm file
C:\testing\cruise\cruise.rsm
references the source file ..\csrc\ramp.c, the
absolute path to ramp.c will be
C:\testing\csrc\ramp.c.
For convenience, the .rsm file editor provides two buttons for converting paths from relative to absolute form, and vice-versa. To use one of these buttons, first select a source file or library by clicking on it, and then click on either the Relative or Absolute button to the right of the window containing the source file or library.
- 1
- Reactis Build Files were previously called Reactis Makefiles, hence the file suffix .rsm. The more generic “Build File” notation was adopted to distinguish from the specific Unix/GNU Make build environment.