Chapter 11 The Reactis Test-Suite Browser
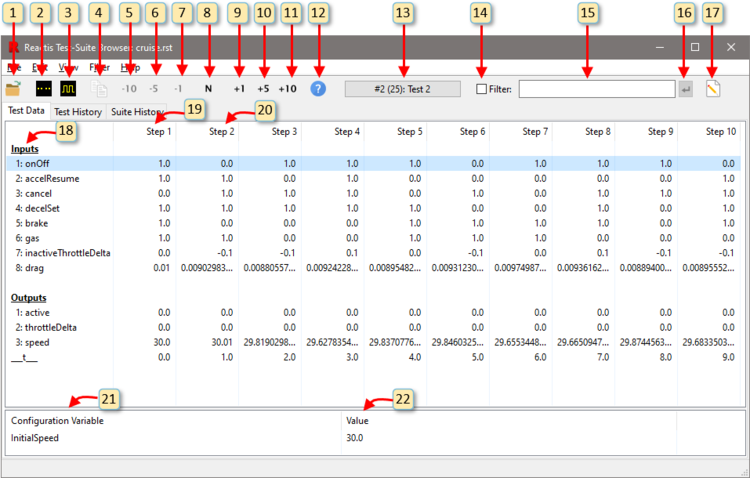
The Test-Suite Browser allows you to view test suites. Figure 11.1 contains an annotated screenshot of the Test-Suite Browser, is used to examine the contents of a test suite. The body of the window displays the data for the currently selected test, and consists of three tabs:
- Test Data
- Displays a matrix whose first column lists the input ports, test points, and output ports of the model and whose subsequent columns each represent a simulation step. Within each of these latter columns there is a value for each inport, test point, and outport.
- Test History
- Displays history information logged by Reactis for the currently selected test.
- Suite History
- Displays history information logged by Reactis for the test suite.
11.1 Labeled Window Items
The following items are labeled in Figure 11.1:
- Display a file-selection dialog to specify an .rst file for loading into the browser.
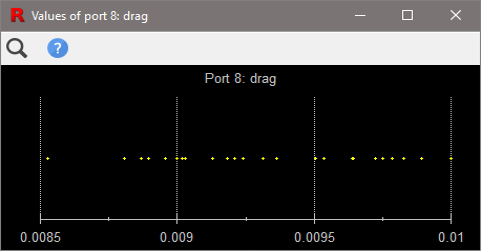
- Open a distribution scope to display the distribution of values the selected port assumes in the test suite, as shown in Figure 11.3. Alternatively, it is possible to view the values assumed during a single test or group of tests, rather than during the entire test suite. This may be done by right-clicking on the selected port or by using the relevant items in the View menu; see Section 11.2 for details. The button is disabled when a filter is active.
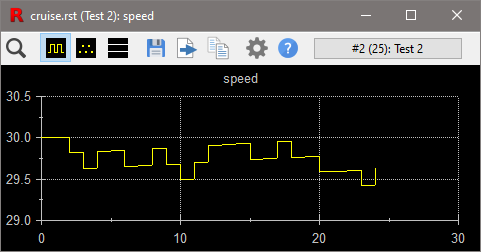
- Open a scope for the selected port(s). The scope will be similar to the one shown in Figure 11.2.
- If either of the Test History or Suite History tabs are selected, copy any of the selected log information to the clipboard.
- Go back 10 steps in the current test.
- Go back 5 steps in the current test.
- Go back 1 step in the current test.
- Specify a step in the current test to view.
- Go forward 1 step in the current test.
- Go forward 5 steps in the current test.
- Go forward 10 steps in the current test.
- Display Reactis Test-Suite Browser help.
- This pull-down menu enables you to select a test from the currently loaded test suite to view in the browser. The face of the button shows a message of the form #tnum (tsteps): tname where tnum is the test number, tsteps is the number of steps in the test, and tname is the test name. When a filter is active, the text in parentheses changes to matching of tsteps where matching is the number of steps in the test that match the filter.
- Checking this box activates the filter. When a filter is active only steps for which the filter expression evaluates to true will be displayed.
-
A filter expression may be entered in this text entry box. When a filter is
active, the main browser panel shows only test steps for which the expression
evaluates to a non-zero value. You activate a filter by:
- pressing the return key in the entry box, or
- checking the check box to the left of the entry box, or
- clicking the enter button to the right of the entry box.
brake == 1’ and press return.The syntax for filter expressions is ANSI C. The variables in the expression may be the names of inports, outports, or test points from the test suite. The elements of a vector item in the test suite can be accessed using the array indexing notation of the C language (note that indexing is 0-based). The elements of a bus may be accessed using the C structure notation, e.g. X.Y if Y is an element of bus X. Some examples demonstrate the most common operators:
Filter Expression Result (brake == 1) && (active == 1)All steps in which the brake is pressed and the cruise control remains active (indicating a serious error) (speed < 30) && (active == 1)All steps in which cruise is active at a speed less than 30 (cancel == 1) || (decelSet == 1)All steps in which either cancel or decelSet is pressed (inp[0] > 0) && (inp[1] > 0)All steps in which the first two elements of vector input inp are positive - Clicking this button activates the filter. When a filter is active only steps for which the filter expression evaluates to true will be displayed.
- Clicking this button opens the Reactis Test Step Filter Editor dialog shown in Figure 11.4. The editor lets you formulate more complicated filters.
- This column lists the inports, test points, and outports of the model.
- Values of inports, test points, and outports in step 1 of the current test.
- Values of inports, test points, and outports in step 2 of the current test.
- This column lists the name of each configuration variable.
- This column lists the value of each configuration variable in the current test.
11.2 Menus
- File menu.
- The File menu contains the following entries:
- Open...
- Launches a file-selection dialog for choosing a new .rst file to browse.
- Close.
- Close the current .rst file.
- Exit.
- Exit the Test-Suite Browser.
- Edit menu.
- The Edit menu contains the following entries:
- Copy.
- If either of the Test History or Suite History tabs are selected, copy any of the selected log information to the clipboard.
- Select All.
- Select all log information in the currently displayed tab.
- View menu.
- The View menu contains the following entries:
- 10 Steps Back.
- Go back 10 steps in the current test.
- 5 Steps Back.
- Go back 5 steps in the current test.
- 1 Step Back.
- Go back 1 step in the current test.
- Go to Step...
- Specify a step in the current test to view.
- 1 Step Forward.
- Go forward 1 step in the current test.
- 5 Steps Forward.
- Go forward 5 steps in the current test.
- 10 Steps Forward.
- Go forward 10 steps in the current test.
- Significant Digits (Current Port)...
- Specify how many significant digits should be used when displaying the values flowing over the currently selected port. If ’-1’ is specified then the default number of significant digits will be displayed (16 for doubles and 8 for singles).
- Significant Digits (All Items)...
- Specify how many significant digits should be used when displaying the values flowing over all ports in the model. If ’-1’ is specified then the default number of significant digits will be displayed (16 for doubles and 8 for singles).
- Visible Steps...
- Set the number of test steps to be shown in the main panel of the browser window.
- Open Distribution Scope (Whole Suite).
- For the currently selected port,
open a distribution scope to display (as shown in Figure 11.3)
the values the port assumes when executing the test suite.
- Open Distribution Scope (Current Test).
- For the currently selected port, open a distribution scope to display the values the port assumes when executing the currently selected test.
- Open Distribution Scope (Selected Tests)...
-
Open a dialog to select a subset of tests from the current test suite;
then, for the currently selected port, open a distribution scope to
display the values the port assumes when executing the tests in the
selected subset.
The dialog for selecting a subset of tests works as follows. Holding down the control key and clicking on different tests enables you to select a group of tests. For example test 1, test 3, and test 5 may be selected by holding down the control key and clicking on each of those three tests. Alternatively, holding down the shift key and clicking on two different tests will add the two tests along with all tests between them to the group. This approach may be used to select tests 1-4 by holding down the shift key and clicking on test 1 and then test 4.
- Open Scope (Selected Rows)
- Open a scope to display the currently selected row(s).
- Open Scope (Signal Group).
- Open a scope for the specified
signal group. A signal group is created by clicking the save button
(
 ) in a scope to save the current configuration of the scope
as a signal group (set of signals along with the scope settings for
displaying them).
) in a scope to save the current configuration of the scope
as a signal group (set of signals along with the scope settings for
displaying them). - Delete Signal Group.
- Delete the selected signal group.
- Filter menu.
- The filter menu lets you display only a subset
of rows and columns in the main panel.
- Edit Column Filter...
- Open the Test Step Filter editor shown in Figure 11.4 and described in the subsequent text. The editor lets you create a filter to identify test steps in the test suite that satisfy a particular condition. For example, all test steps in which the cruise control is active.
- Enable Column Filter.
- This menu entry toggles whether or not the column filter is active. When active, only steps satisfying the filter expression are displayed in the main panel.
- Show Hidden Columns.
- You can toggle this entry to cause Reactis to display steps for which the filter expression is false as well as those for which it is true. Steps for which the filter expression evaluates to false will have their values and step number displayed within parentheses.
- Hide Selected Rows.
- Hide the currently selected rows. Note you may select a range of rows by left-clicking on a row, then holding down the shift key and left-clicking on a second row. All rows from the first row selected to the second row selected (inclusively) will be selected. Alternatively, a group of rows can be selected by holding down the control key and left-clicking on each row to be included in the group.
- Unhide Selected Rows.
- Unhide the currently selected rows. Note, to select hidden rows you must first toggle the Show Hidden Rows menu entry.
- Show Hidden Rows.
- Display hidden rows in the main panel. Note, in this mode, when a row is hidden, the item name and all values will be grayed out.
- Help menu.
- The Help menu contains the following entries:
- Contents.
- Go to the table of contents in the documentation.
- Index.
- Go to the index in the on-line documentation.
- Test-Suite Browser.
- Display Test-Suite Browser help.
11.3 Test Step Filter Editor
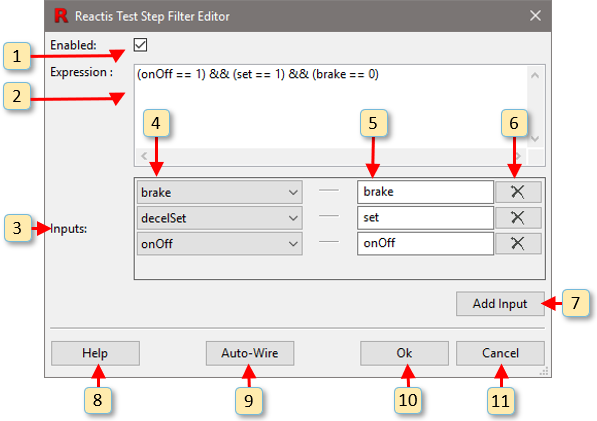
The Test Step Filter Editor, shown in Figure 11.4, lets you formulate filters to search for test steps in a suite that satisfy a given condition.
The labeled items in the figure work as follows.
- Enable or disable the filter.
- Enter a filter expression in this entry box. When a filter is active, the
Test Suite Browser displays only test steps for which the expression evaluates
to a non-zero value. The syntax for the expression is ANSI C. The variables in
the expression take their values from inports, outports, or test points from the
test suite. The elements of a vector item in the test suite can be accessed
using the array indexing notation of the C language (note that indexing is
0-based). Some examples demonstrate the most common operators:
Filter Expression Result (brake == 1) && (active == 1)All steps in which the brake is pressed and the cruise control remains active (indicating a serious error) (speed < 30) && (active == 1)All steps in which cruise is active at a speed less than 30 (cancel == 1) || (decelSet == 1)All steps in which either cancel or decelSet is pressed (inp[0] > 0) && (inp[1] > 0)All steps in which the first two elements of vector input inp are positive - The variables used in the expression are defined in this section. They
are termed inputs because the filter expression can be viewed as the body of a
function and the inputs are the formal input parameters of the function. To
apply the filter function to a given test step, values from the test step serve
as actual parameters fed into the filter function for evaluation of the filter
expression. The elements of a vector item in the test suite can be accessed
using the array indexing notation of the C language (note indexing is 0-based).
For example, if an input inp is a vector of length 3, then we can check for
steps in which elements of inp are positive with the filter expression:
(inp[0] > 0) && (inp[1] > 0) && (inp[2] > 0)
The elements of a bus may be accessed using the C structure notation, e.g. X.Y if Y is an element of bus X. - Each pulldown in this column includes an entry for each input, output, test point, and sample time in the test suite. The item selected will be fed into the input named in the next column when evaluating the filter expression.
- Each entry box in this column names an input/variable to be used in the filter expression.
- Clicking this button deletes the filter input.
- Clicking this button adds a new filter input.
- Open help for the Filter Editor.
- Clicking this button causes Reactis to attempt to automatically compute the entries in the inputs section. For each variable in the filter expression an input row will be added if it does not already exist. Furthermore the input will be wired (pulldown in the first column selected) to the input, output, or test point of the same name if one exists in the test suite.
- Save the changes made in the Filter Editor and close the dialog.
- Discard the changes made in the Filter Editor and close the dialog.