10. Reactis Validator#
Reactis Validator searches for defects and inconsistencies in models. The tool enables you to formulate a property that model behavior should have as an assertion, attach the assertion to a model, and perform an automated search for a violation of the assertion. If Validator finds an assertion violation, it returns a test that leads to the problem. This test may then be executed in Reactis Simulator to gain an understanding of the sequence of events that leads to the problem.
Validator also allows you to specify specific test scenarios that you want exercised using one of two alternative mechanisms. User-defined targets enable you to specify an abstract test scenario, whereas virtual sources give you a way to easily specify a concrete scenario.
User-defined targets (User-Defined Coverage Targets) may be seen as extensions to the built-in coverage metrics supported by Reactis: in generating test data, Validator (and Tester) will attempt to generate tests that satisfy the indicated scenarios. Like assertions, user-defined targets are virtually attached to models within Reactis, so your model is not modified.
Virtual sources (Virtual Sources) are placed at the top level of a model to control one or more top-level inports as a model executes in Reactis. That is you can specify a sequence of values to be consumed by an inport during simulation or test-generation. Virtual sources can be easily enabled and disabled. When enabled, the virtual source controls a set of inports and while disabled those inports are treated by Reactis just as normal top-level inports.
Validator is particularly useful in requirements validation. Given a list of requirements on model behavior, you can formulate assertions (to check whether a requirement is being satisfied) and user-defined targets or virtual sources (to define test scenarios intended to “stress” the requirement).
Engineers use Validator as follows. First, a model is instrumented with assertions to be checked, user-defined targets, and virtual sources. We refer to assertions, user-defined targets, and virtual sources as Validator objectives. The tool is then invoked on the instrumented model to search for assertion violations and paths leading to the specified user-defined targets. The output of a Validator run is a test suite that includes tests leading to objectives found during the analysis.
User-defined assertions and targets may be added to any Simulink system or Stateflow diagram in a model; whereas, virtual sources may only be added at the top-level of the model. When adding Validator objectives to a model, three mechanisms (only the first two are available for virtual sources) for formulating objectives are supported:
- Expression objectives
are C-like Boolean expressions.
- Diagram objectives
are references to subsystems in standard Simulink/Stateflow libraries.
- Timer objectives
are directives that tag a model data item as a timer or counter.
An expression objective is a C-like Boolean expression whose variables are wired to data items from the context of the model in which the objective is inserted. Expression objectives are easily attached and modified from the Reactis GUI. For more information on valid expressions see The Simulink Expression Objective Dialog section and The Stateflow Expression Objective Dialog section.
Diagram objectives give users the full power of Simulink / Stateflow to formulate assertions, user-defined targets, and virtual sources. The objectives may use any Simulink blocks supported by Reactis, including Stateflow diagrams. Diagram objectives are attached to a model using the Reactis GUI to select a Simulink system from a library and “wire” it into the model. The diagrams are created using Simulink and Stateflow in the same way standard models are built. After adding a diagram objective to a model, the diagram is included in the model’s hierarchy tree, as are other library links in a model.
A timer objective indicates that a model element acts as a timer or counter. A timer target is covered when the value of the selected data item is changed from the start value to the end value (typically by repeatedly adding the step value to the data item, although this is not strictly necessary - the timer target will still be covered if some or all of the intermediate values are skipped). For some models, adding timer targets will help Reactis Tester attain higher levels of coverage. Conceptually, this is because the timer target guides Reactis to generate tests which continue stepping until a timer expires or a counter reaches its final value. In the case of a timer assertion, the assertion is considered violated if the conditions which would cause a timer target with the same parameters to be covered occur.
10.1. The Meaning of Validator Objectives#
We now explain in more detail how Reactis interprets Validator objectives. Coverage of these objectives may be tracked in the same manner as built-in coverage targets (e.g. MC/DC); namely through highlighting and hovering in the main Reactis panel, through the Coverage-Report Browser, and through reports generated by Simulate > Fast Run with Report.
10.1.1. Assertions#
Assertions specify properties that should always be true for a model. For a given assertion, Validator searches a model for a simulation run that leads to a state in which the assertion does not hold. An expression assertion fails to hold if the given expression evaluates to false[1]. A timer assertion fails to hold if the data item it tracks ever changes from its start value to the end value by a specified increment. A diagram assertion fails to hold if any output port assumes the boolean value “false” or a numeric value zero. Note that if a diagram has more than one output port, the individual outports are treated as distinct assertions. That is each individual outport is listed in the objective list of the Info File Editor. Also, the individual ports are highlighted independently in the main panel according to whether they are violated or not.
An assertion is considered “covered” when a violation is found. So in contrast to targets, where being covered is considered good, covering an assertion is bad. We therefore highlight covered assertions in red and yellow, in contrast to targets where uncovered targets are highlighted in red.
10.1.2. User-Defined Coverage Targets#
User-defined coverage targets extend the Reactis built-in targets described in the Reactis Coverage Metrics (branch coverage, state coverage, condition-action coverage, MC/DC, etc). If a user-defined target is specified as an expression, Reactis will treat it as covered when the expression evaluates to a non-zero numeric value. If a user-defined target is specified as a timer, the target is considered covered after the data item tracked by the timer changes from its start value to its end value by its specified increment. If a user-defined target is specified as a diagram, Reactis will treat it as covered when all output ports of the associated subsystem have assumed either a boolean “true” value or any non-zero numeric value. Note that if a diagram has more than one output port, the individual port names are listed in the target list and highlighted independently according to whether they are covered or not.
10.1.3. Virtual Sources#
Virtual sources control top-level inports of a model. If a virtual source is an expression, then at each simulation step, the expression is evaluated to compute a value that will be fed into the top-level inport controlled by the virtual source. If a virtual source is specified as a diagram, then each outport of the diagram may be fed into a top-level inport of the model. Some outports of the virtual source diagram may be left unconnected and monitored by an assertion.
10.2. Use Cases of Validator Objectives#
10.2.1. Checking a Requirement with an Expression Assertion and an Expression User-Defined Target#
Consider a cruise control application that has the following requirement:
The cruise control shall remain inactive if the speed of the vehicle is less than 30 mph.
To properly test this requirement we need to execute a test in which an attempt is made to activate the cruise control while the speed of the vehicle is less than 30 mph. We can capture this as a simple expression-based user-defined target:
on && activate && (speed < 30)
This expression would be “wired-in” such that on monitors whether the cruise control is turned on, activate monitors whether an attempt has been made to activate the cruise control, and speed is the speed of the vehicle. When this expression becomes true, we have found a test to check our requirement.
We can test whether the applications response to this test is correct with the following expression assertion:
!(active && (speed < 30))
This expression is wired in so that active monitors whether the cruise control is active. If this expression ever becomes false, then the requirement is violated. Alternatively, this requirement could be specified with an equivalent expression that uses the logical implication operator:
active -> (speed >= 30)
10.2.2. Checking a Requirement with a Diagram Assertion#
Consider another requirement for a cruise control:
When active, cruise control shall not permit actual, desired speeds to differ by more than 1 mph for more than 3 seconds.
This requirement can be checked by a diagram assertion that monitors the vehicle speed, whether the cruise control is active, and the speed at which the driver has set the cruise control. The top-level interface of the Simulink subsystem (in this case a Stateflow diagram) is shown in Figure 10.1.
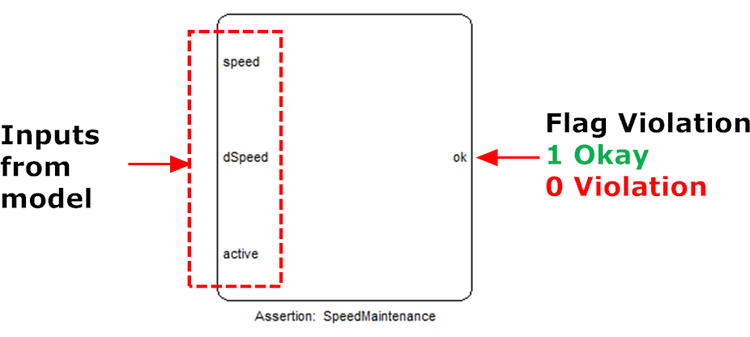
Fig. 10.1 The diagram to check the speed maintenance requirement monitors three data items in the model and raises a flag on its output if the requirement is violated.#
The simple Stateflow diagram that implements the assertion is shown in Figure 10.2. It works as follows:
Initially the diagram is in the Inactive state.
When the cruise control becomes active it enters state Active and child state OkDiff.
When in OkDiff, the diagram computes the difference between the vehicle speed and the speed at which the driver has set the cruise control.
- If the difference exceeds the tolerance, then go to state BigDiff.
- If the difference is less than the tolerance, then stay in OkDiff.
When entering BigDiff, start a counter
- If the speed difference is corrected within 3 steps, then return to OkDiff.
- If the speed difference is not corrected within 3 steps, then flag an error by outputting the value 0 on its outport.
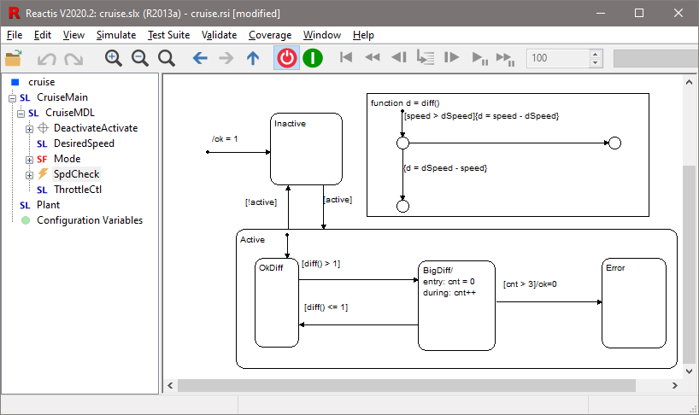
Fig. 10.2 The implementation of the speed maintenance assertion.#
10.2.3. Creating a Functional Test Using a Virtual Source#
The Constructing a Functional Test with User Guided Simulation section showed how you can create a functional test for the cruise control example using the user-guided simulation feature of Reactis Simulator. Virtual sources offer an alternate mechanism for capturing functional tests. Consider the need to test that the cruise control activates and deactivates as expected when executing the following scenario:
Input |
Expected Output of Active |
|
Turn cruise control on |
Off |
|
Press set |
On |
|
Press cancel |
Off |
|
Press set |
On |
|
Press brake |
Off |
|
Press resume |
On |
|
Press gas |
Off |
This scenario can be captured using the virtual source shown in Figure 10.3. The Signal Builder block shown implements the virtual source by capturing the scenario described above. The first six signals are fed into inputs of the model while the final output is monitored by a simple assertion that compares the expected value for active against the actual value produced by the model.
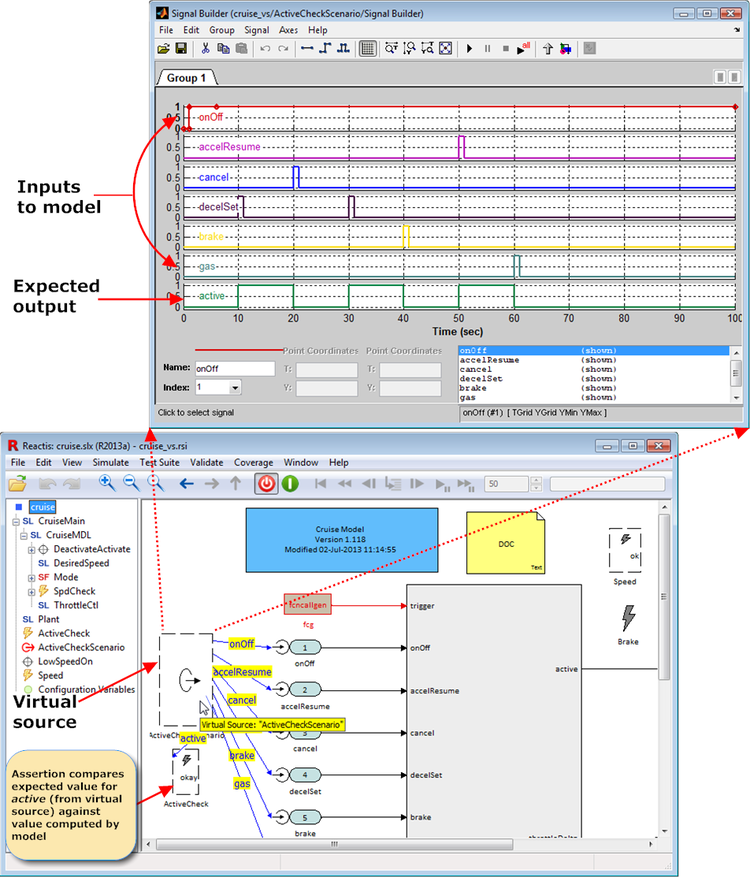
Fig. 10.3 Virtual sources offer an easy way to implement functional tests. Any Simulink / Stateflow construct supported by Reactis may be used to implement the virtual source. Signal Builder blocks are especially useful. A Validator assertion can monitor an output of the virtual source, relieving the user of the tedious task of checking expected values against actual responses of the model.#
10.3. Adding, Editing, and Removing Objectives#
Adding, editing, and removing of objectives is only possible when Simulator is disabled. This is necessary because objectives are linked into a model when Simulator is invoked.
A Validator objective may be added to a model by first selecting in the hierarchy panel the Simulink subsystem or Stateflow state in which the objective should be inserted and then:
right-clicking in an empty space in the subsystem in the main panel of the Reactis window and selecting Add Assertion or Add User-Defined Target or Add Virtual Source; or
by selecting the Validate > Add Assertion or Validate > Add User-Defined Target or Validate > Add Virtual Source menu items from the main menu bar.
Usage of the resulting dialogs is explained in The Simulink Expression Objective Dialog section (expression objectives within Simulink), The Stateflow Expression Objective Dialog section (expression objectives within Stateflow), The Timer Objective Dialog section (timer objectives), and The Diagram Objective Dialog section (diagram objectives).
In Stateflow charts, only expression objectives are supported. Using a group of radio buttons in the wiring dialog, you can choose for the objective to be evaluated at state entry or exit, or every time the chart is triggered while the state is active. These correspond to the usual entry, exit, and during actions of Stateflow. Evaluation of the objective occurs at the end of the corresponding state actions (entry, during, exit).
To edit properties of an objective, either right-click on the objective and select Edit > Properties…, or click on the objective to select it and then choose the Validate > Edit Objective… menu item. Note that all the controls in the properties dialog are disabled if Simulator is currently active. To remove an objective, either:
right-click on the objective and select Remove, or
click on the objective to select it and then choose the Validate > Remove Objective menu item, or
click on the objective to select it and then press the delete key.
Standard cut, copy, and paste operations are available for objectives both from the top-level Edit menu and by right-clicking on an objective. Edit > Undo and Edit > Redo enable you to undo and redo these operations. Objectives may be moved by dragging them with the mouse.
10.3.1. The Simulink Expression Objective Dialog#
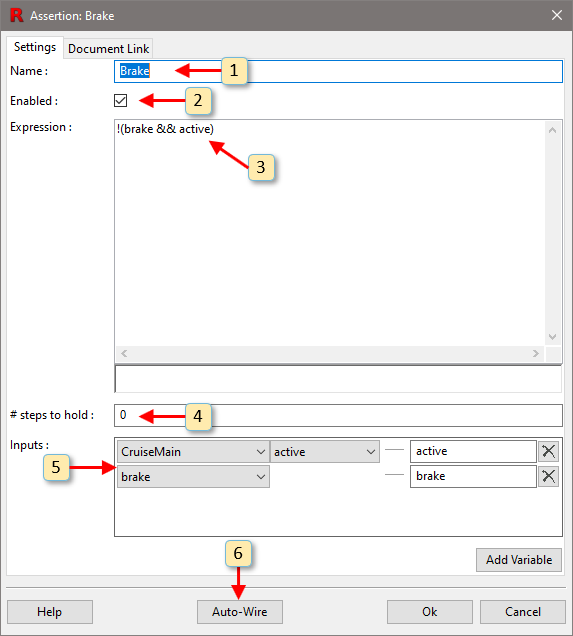
Fig. 10.4 The dialog for editing expression objectives located within Simulink subsystems.#
The numbers below refer to the labels in Figure 10.4.
Objective name. The name must be unique with respect to the subsystem where the objective resides.
Enable or disable the objective. When disabled:
assertions are not checked
user-defined targets are not tracked
virtual sources do not control inports
Expression. Reactis evaluates this expression at each simulation step and interprets the scalar result of numeric type as follows:
- Assertions.
A zero result means a fail has occurred.
- User-Defined Targets.
A non-zero result means the target is covered.
- Virtual Sources.
The result is fed into the inport controlled by the virtual source.
Free variables in the expression are declared in the Inputs section (window item 5) and wired to data items (Simulink blocks or Stateflow variables) visible at the place in the model where the objective resides. Valid operators and functions are listed in Table 10.1.
The expression can extend over multiple lines, no continuation characters are needed.
A
%character can be used to insert comments into the expression. All characters starting from the%character until the end of the line are ignored.Table 10.1 Simulink expression objective operators and functions.# Symbol/Name
Operation
+,-,*,/Add, Subtract, Multiply, Divide
<,>Less than, Greater than
<=,>=Less than or equal, Greater than or equal
==Equal
!=Not equal
->Logical Implication
!Logical Not
||Logical Or
&&Logical And
[ ]Vector element access
a.bAccess element b of bus a
abs(),fabs()Absolute value
x^y,pow(x,y),power(x,y)xto the poweryexp()Exponent
ln(),log(),log10()Logarithm
sqrt()Square root
rem()Division remainder
infInfinity value
floor(),ceil()Rounding
cos(),sin(),tan()Trigonometric functions
cosh(),sinh(),tanh()Hyperbolic trigonometric functions
acos(),asin(),atan(),atan2()Inverse trigonometric functions
pre()Access values from previous simulation steps (see the Accessing Values from Previous Simulation Steps section).
ifexpr1thenexpr2elseexpr3If
expr1is true, evaluateexpr2. Otherwise evaluateexpr3.⋕ steps to hold. This is a non-negative integer value. For assertions, this entry specifies the number of simulation steps that the expression must remain false before flagging an error. For user-targets, the entry specifies the number of steps that the expression must remain true before the target is considered covered.
Inputs. This is where variables used to construct the expression are declared. Each variable can be viewed as an input to the objective. Clicking the Add Variable button adds a row to the section. The rightmost entry box of a row is where you enter the name of a variable. The column(s) to the left of the variable name specify which data item from the model is wired to the variable. Clicking the X button to the right of a row deletes the variable declaration.
Note that you can leave any of these selections empty and then later connect them via drag-and-drop in the main panel (see the Wiring Validator Objectives Within the Reactis Main Panel section). Any variables referenced in the expression that are not declared in this section will be automatically added to the list (with empty wiring).
When the dialog is dismissed, the wiring specified here may be viewed from the main panel of the Reactis window by hovering over the objective. The wiring will be shown as blue lines which can be thought of as virtual wiring. For each input of the objective, a blue line will be drawn from a data item in the model to the input to indicate how the input is wired.
Auto-Wire. Clicking on this causes Reactis to attempt to automatically select the data items from the model that should feed into the inputs of the objective. For an inport X of an objective O, the pairing algorithm selects a data item D if:
D is a Simulink block named X, or
D is an outport named X of a subsystem with the same parent as O
If there are no matches or more than one possible match, the auto-wiring attempt will fail for X and the inport will need to be manually bound to a data item.
For virtual sources an additional pull-down menu at the bottom of the dialog enables you to specify the model inport that the virtual source controls.
10.3.2. The Stateflow Expression Objective Dialog#
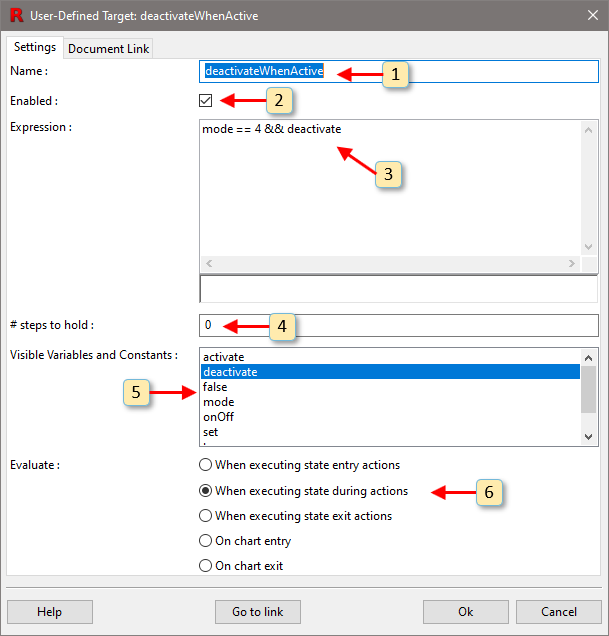
Fig. 10.5 The dialog for editing expression objectives located within Stateflow charts.#
The numbers below refer to the labels in Figure 10.5.
Objective name. The name must be unique with respect to the objectives in the state where the objective resides.
Enable or disable the objective. When disabled:
assertions are not checked
user-defined targets are not tracked
Expression. Reactis evaluates this expression at the point determined by window item 6 and interprets the scalar result of numeric type as follows:
- Assertions.
A zero result means a fail has occurred.
- User-Defined Targets.
A non-zero result means the target is covered.
Valid operators and functions are listed in Table 10.2.
The expression can extend over multiple lines, no continuation characters are needed.
A
%character can be used to insert comments into the expression. All characters starting from the%character until the end of the line are ignored.Table 10.2 Stateflow expression objective operators and functions.# Symbol/Name
Operation
+,-,*,/Add, Subtract, Multiply, Divide
<,>Less than, Greater than
<=,>=Less than or equal, Greater than or equal
==Equal
!=Not equal
->Logical Implication
!Logical Not
||Logical Or
&&Logical And
[ ]Vector element access
a.bAccess element b of bus a
abs(),fabs()Absolute value
x^y,pow(x,y)xto the poweryexp()Exponent
log(),log10()Logarithm
sqrt()Square root
floor(),ceil()Rounding
cos(),sin(),tan()Trigonometric functions
cosh(),sinh(),tanh()Hyperbolic trigonometric functions
acos(),asin(),atan(),atan2()Inverse trigonometric functions
double(),single(),boolean(),int8(),int16(),int32(),uint8(),uint16(),uint32()Type cast functions
pre()Access values from previous simulation steps (see the Accessing Values from Previous Simulation Steps section).
ifexpr1thenexpr2elseexpr3If
expr1is true, evaluateexpr2. Otherwise evaluateexpr3.in_state(A)Returns true if state A is active, otherwise returns false. The state name argument must be a fully-qualified state path. For example, in a chart with a state A which contains child state B, write
in_state(A.B)to test whether B is active. If placed within apre()call (e.g.pre(in_state(A.B))), it returns whether the state was active in the previous step.⋕ steps to hold. This is a non-negative integer value. For assertions, this entry specifies the number of simulation steps that the expression must remain false before flagging an error. For user-targets, the entry specifies the number of steps that the expression must remain true before the target is considered covered.
Visible variables and constants. This lists the variables and constants visible in the scope where the objective is located. Double-clicking on an item in this list will insert it into the expression (window item 5) text box.
Specifies the point during execution when this objective is checked:
- When executing state entry actions
The objective is checked after the “entry” actions of the state in which it is located execute.
- When executing state during actions
The objective is checked after the “during” actions of the state in which it is located execute.
- When executing state exit actions
The objective is checked after the “exit actions” of the state in which it is located execute.
- On chart entry
The objective is checked every time the chart becomes active, before any events are processed within the chart.
- On chart exit
The objective is checked every time the chart becomes inactive, after all events have been processed within the chart.
10.3.3. The Timer Objective Dialog#
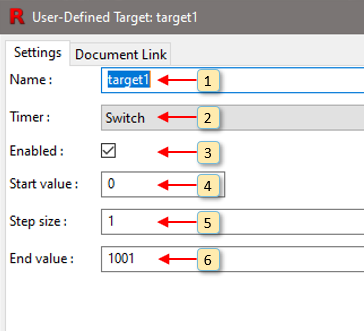
Fig. 10.6 The dialog for inserting/modifying timer objectives.#
The timer objective dialog is used to add a timer target to a model or edit the parameters of an existing timer target. A timer target can be added by right clicking within the main panel and selecting Add User-Defined Target > Timer. Timer targets can be added within blank areas of Simulink subsystems, or anywhere within a Stateflow chart (including inside a state). A timer objective dialog is shown in Figure 10.6. The numbers below refer to the labels in that figure.
Name. The name must be unique within the subsystem where the objective resides:
If a timer objective is located in Simulink, then its name must not be the same as any block or other Validator objective residing in the same subsystem.
If a timer objective is located in Stateflow, then its name must not be the same as any other Validator objective residing in the same state.
Timer. The data item from the model to be tracked as a timer. The pull-down menu lists all possible data items in the subsystem/state where the objective will reside.
Enable or disable the objective. When disabled the timer target is not tracked.
Start value. The initial value of the timer.
Step size. The amount the timer increases or decreases during a step.
End value. The end value of the timer.

Fig. 10.7 The timer target Sustained Fault is covered when the output of the Product block steps from 0 to 110.#
A typical use-case for a timer target is shown in Figure 10.7. It shows a subsystem which signals a fault when a sensor input is negative for 100 consecutive simulation steps. The timer target Sustained Fault is covered when the output value of the Product block reaches 110 (at which point the output fault will have been true for 10 consecutive steps). Adding this target to the model helps Tester rapidly reach 100% coverage.
One important note: in Figure 10.7, the timer target does not use the output of the Count block as the counter. Instead it uses the input to the Count block. When a unit delay block is used as a timer/counter, Tester generally produces better coverage for timer targets when using the input to the unit delay block rather than the output of the block. The recommended best practice for creating timer targets which rely on unit delay blocks is to use the input to the block rather than the output as the basis for the target.
10.3.4. The Diagram Objective Dialog#
The Diagram Objective Dialog is the vehicle for adding diagram-based assertions and user-defined targets. It is also used to modify existing diagram objectives. You invoke it by right-clicking in the main panel in white space within a Simulink subsystem and selecting either:
Add User-Defined Target > Diagram, or
Add Assertion > Diagram
The numbers below refer to the labels in Figure 10.8.
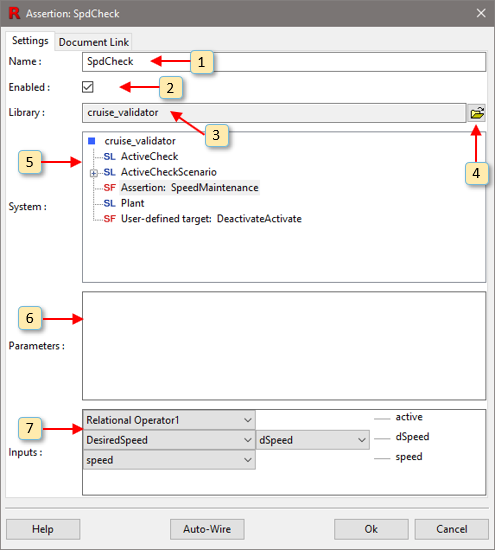
Fig. 10.8 The dialog for inserting/modifying diagram objectives.#
Objective name. The name must not be the same as any block or Validator objective within the subsystem where the objective resides.
Enable or disable the objective. When disabled:
assertions are not checked
user-defined targets are not tracked
virtual sources do not control inports
Name of the currently chosen objective library. This is a standard
.slxfile or.slxfile storing a Simulink library containing the Simulink / Stateflow subsystems that will be wired into a controller model as Validator diagram objectives. This file is constructed in the usual manner using The MathWorks’ Simulink and Stateflow editors. Note that the actual wiring is established and maintained by Reactis, so the controller model being validated need not be modified at all. The wiring information is stored by Reactis in the.rsifile associated with a model.Clicking here opens a file selection dialog for choosing a Validator objective library.
System. This tree represents the structure of the library specified in window item 3. Selecting an item in the tree indicates the Simulink subsystem from the library that encodes the objective.
Parameters. If the system chosen above is a masked subsystem, the values for the mask parameters may be entered here.
Inputs. This section enables the user to specify the wiring between input ports of the diagram objective and the blocks in the subsystem of the model where the objective resides. Labels on the right represent the input ports of the diagram objective. The menus to the left list data items from the model that may be wired to the inputs of the objective. Note that an entry in the second column of menus only appears if the item selected in the first column is a block with more than one output. The second column menu selects one of the multiple outputs of the block in column one.
Note that you can leave any of these selections empty and then later connect them via drag-and-drop in the main panel (see the Wiring Validator Objectives Within the Reactis Main Panel).
When the dialog is dismissed, the wiring specified here may be viewed from the main panel of the Reactis window by hovering over the diagram objective. The wiring will be shown as blue lines connecting inputs of the objective to data items that flow into the inputs from the model being instrumented for validation.
If the diagram objective is a virtual source, the dialog will have an additional Outputs section at the bottom. This section contains pull-down menus that enable you to specify the model inports that the virtual source controls. Each output of the virtual source may control one input of the model. Virtual source outputs left unconnected may be monitored by assertions.
When the dialog is dismissed, the wiring specified here may be viewed from the main panel of the Reactis window by hovering over the diagram objective. The wiring will be shown as blue lines connecting each outport of the virtual source to the model inport that it controls. Alternatively, you may hover over a controlled model inport to display the blue line connected to the virtual source that controls it.
10.3.5. Accessing Values from Previous Simulation Steps#
Some Validator objectives may require access to values from previous simulation steps. For example, testing whether a block’s output has changed by more than a certain amount requires subtracting the previous output value from the current output value. In diagram objectives, values from previous steps are accessed via Simulink’s Unit Delay block. In expression objectives, prior values are accessed by using the pre() function.
The pre() function can take either one or two arguments. The first argument is an expression which will be evaluated in the context of a previous simulation step. For example, pre(x+y) will return the sum of the values held by x and y during the previous simulation step. The optional second argument to the pre() function specifies the number of simulation steps to go back, so pre(x+y,2) will return the sum of x and y from two steps ago, pre(x+y,3) will return the sum of x and y from three steps ago, and so on.
If the pre() function is used to access a value prior to the first simulation step (e.g., when pre() is called during the first simulation step), the returned value will be zero. If this produces undesirable results, an if-then-else clause should be used to avoid invoking pre() until a sufficient number of simulation steps have been taken.
For example, to create an assertion that checks whether a variable x never changes by more than 0.5 per simulation step, use the following expression:
if t==0 then 1 else abs(x-pre(x))<=0.5
This expression returns true on the first simulation step. On all subsequent steps, it returns true if the difference between the current and previous values of x does not exceed 0.5.
10.3.6. Wiring Validator Objectives Within the Reactis Main Panel#
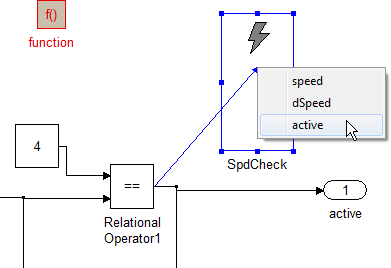
Fig. 10.9 Connecting the output of “Relational Operator1” to the “active” input of Validator objective “SpdCheck”.#
Selecting the proper wiring in the Validator objective property dialogs shown in the previous sections can sometimes be difficult, especially if the blocks in a system do not have descriptive names. As an alternative, you can wire up objectives within Simulink systems via drag-and-drop in the main panel. When creating a new objective, just leave the entries in the inputs wiring table unconnected when dismissing the dialog. For expression objectives, you do not need to manually add the variables to the wiring table. Reactis will automatically add any missing variables.
After creating an objective and clicking “OK” in the dialog, you can now use drag-and-drop to connect the inputs of the objective:
Left-click on a signal line or a block with only one output port and hold the mouse button down.
Reactis will draw a dashed line from the output port of the block that feeds the signal line to the current mouse position.
While holding the button, move the mouse cursor to the Validator objective to which you want to connect the signal.
While over the objective, release the mouse button. Reactis will select the objective and show a menu listing all of its inputs.
Select the desired input in the menu. This sets the wiring. Note that if some other signal was connected to the input, it will be replaced with the new connection.
You can inspect the proper wiring by hovering over the objective.
10.4. Linking to Requirements Documents#
As described above, Validator helps you check if a model satisfies its requirements. Reactis offers a facility to establish and manage links between a natural language requirement and Reactis Validator objectives (assertions and user-defined targets) that check for violations of the requirement. Since a large variety of tools and systems exist to manage natural language requirements, Reactis offers generic mechanisms for linking from a Validator objective to one or more requirements.
Two alternative mechanisms for linking are supported:
Tool mechanism: you specify an executable program available on the local system that Reactis should invoke to open the requirement.
URL mechanism: you specify a URL which Reactis will open in the system’s web browser to open the requirement.
In either case, configurable parameters to the tool or URL will be used to identify the specific requirement. The following sections describe how to set up and use these mechanisms in Reactis.
Once a link is configured for an objective, you can right-click on the objective in the main Reactis panel and select Go to Linked Requirement to open the corresponding requirement in your system.
In addition to linking from Reactis to a requirement, it is also possible to link from a requirement in a third-party requirement-management tool to an objective within Reactis by directing the application to open a URL provided in Reactis’ requirement linking dialog (see Link to this assertion box in Figure 10.11).
10.4.1. Requirement Link Patterns#
Before any links to requirements can be created, you must first create a least one requirement link pattern. A requirement link pattern is a template for a URL or shell command which is instantiated to create a functional link.
A requirement link pattern has three components:
Name – A unique string used to identify the pattern.
Type – Either URL or Tool - determines how the links created from the pattern are opened.
Value – A template URL or shell command (determined by the type) which is instantiated to create a complete link.
10.4.2. Requirement Link Pattern Properties Dialog#
Requirement link patterns are saved in the .rsi file. To view, add or modify a
pattern, select Edit > Requirement Link Patterns…. This will open the
Reactis Info File Editor and select the Requirement Link Patterns pane. This
pane displays all requirement link patterns and provides basic editing functions (see
Requirement Link Patterns Pane for details).
When a requirement link pattern is added or edited, a Requirement Link Pattern Properties dialog will open, as shown in Figure 10.10. This dialog lets you set the three components of the pattern:
The name of the pattern.
The pattern type (Tool or URL), selected via a pulldown menu.
The pattern value. This is a string that contains variables which are replaced to create a complete link.
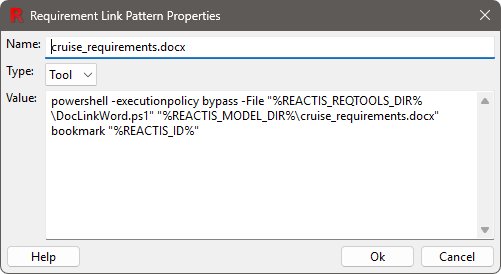
Fig. 10.10 The Requirement Link Pattern Properties dialog lets you create or edit a requirement link pattern. Such a pattern can be instantiated to form a link to a particular natural language requirement managed in an external tool.#
10.4.3. Requirement Link Pattern Variables#
Requirement link patterns can contain pattern variables. A pattern variable is an identifier which is enclosed by a percent sign at the beginning and end (similar to Windows environment variables). Reactis provides several predefined variables. These are listed in the table below.
Name |
Value |
|---|---|
%REACTIS_ID% |
The requirement id of the current link. You specify this id when you create a link in order to identify a particular requirement. |
%REACTIS_DIR% |
The directory where Reactis is installed |
%REACTIS_MODEL_DIR% |
The directory where the currently open model is stored. |
%REACTIS_MODEL_NAME% |
The name of the currently open model. |
%REACTIS_REQTOOLS_DIR% |
Directory holding scripts/tools for requirement linking included with Reactis. |
In addition to the predefined variables, you can use your own variables in a requirement link pattern. Variables which are not predefined by Reactis will be replaced by the value of the Windows/Linux environment variable with the same name.
The value of %REACTIS_ID% will be replaced with value you specify for it in the Requirement Link Properties dialog (Figure 10.13).
For example, in Figure 10.10, three
variables are used: REACTIS_REQTOOLS_DIR, REACTIS_MODEL_DIR and REACTIS_ID. Note
that the DocLinkWord.ps1 script in the %REACTIS_REQTOOLS_DIR% used there is a
sample Microsoft PowerShell script provided with Reactis which opens up Word and
highlights the requirement by looking for a bookmark in the
cruise_requirements.docx document. This example script can be used as a
starting point for creating similar scripts to open requirements in other
similar tools.
10.4.4. Adding Requirement Links#
Each dialog for inserting or modifying a Validator objective includes a tab named Requirement Link, as shown in Figure 10.11. This example shows a link between the assertion LowSpeedInactive and a natural language requirement located at a bookmark named LowSpeedInactive in the Microsoft Word document cruise_requirements.docx.
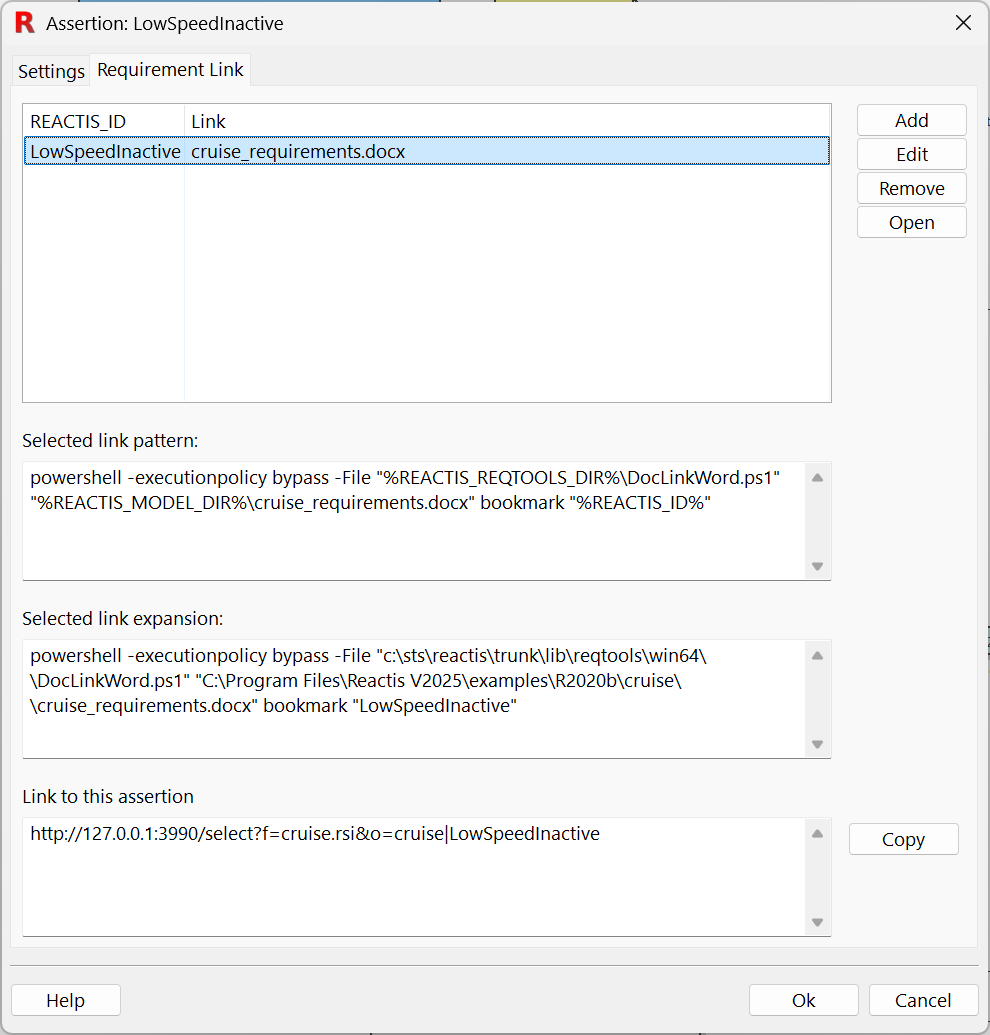
Fig. 10.11 The dialog for establishing and maintaining a link between a Validator objective and a natural language requirement. This example shows a link to a bookmark in a Microsoft Word document.#
The different elements of the Requirement Link tab are labeled in Figure 10.12 and work as follows:
This section lists the REACTIS_ID and requirement link pattern for each requirement link for the Validator objective.
This button adds a new requirement link.
This button opens an editor for the currently selected requirement link.
This button removes the currently selected requirement link.
This button causes Reactis to take the appropriate action to follow the link to the specified natural language requirement. For a URL link, Reactis opens with the URL specified by the link in the default web browser. For a Tool link, Reactis executes the command specified by the link, for example opening Microsoft Word, loading a document, and navigating to a bookmark.
This section displays the pattern used by the currently selected requirement link.
This section displays the currently selected requirement link after variables in the pattern have been expanded.
This section displays a URL that can be used to highlight the Validator objective in Reactis.
This button copies the URL (item 8) to the clipboard.
This button displays help for the dialog.
This button accepts any changes and closes the dialog.
This button rejects any changes and closes the dialog.
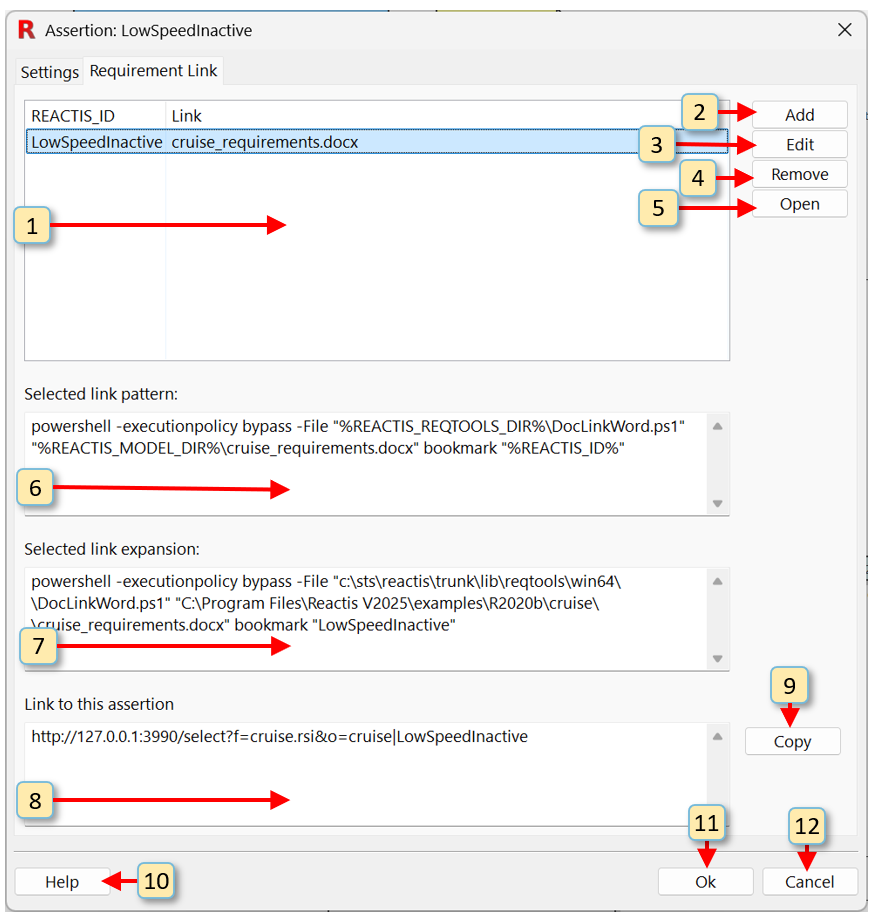
Fig. 10.12 The dialog for establishing and maintaining a link between a Validator objective and a natural language requirement.#
10.4.5. Requirement Link Properties Dialog#
When you click on either the Add or Edit button (items 2 and 3 in Figure 10.12), A dialog similar to the one shown in Figure 10.13 will appear. This dialog contains two values which need to be set in order to complete the link:
The value of REACTIS_ID to be used when instantiating the requirement link pattern.
The name of the requirement link pattern, which is selected via a pulldown menu.
The other parts of the dialog (the type, the value and the link expansion) are not editable and are automatically filled-in based on the REACTIS_ID and the selected pattern.
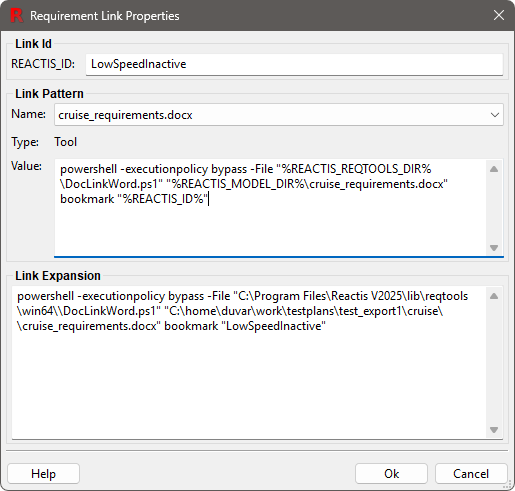
Fig. 10.13 The Requirement Link Properties dialog.#
10.5. Running Reactis Validator#
After adding assertions and user-defined targets to a model, Validator may be invoked by selecting the Validate > Check Assertions… menu item to determine whether or not assertion violations can be found. Figure 10.14 contains an annotated screen shot of the Validator launch dialog; the labeled items are described in the next subsection. It should first be noted, however, that the Validator launch dialog is very similar to that of the Tester launch dialog as described in The Tester Launch Dialog section. This similarity is due to the fact that conceptually, Validator works by generating test data using the Tester test-generation algorithm and then running the tests on the instrumented model to check for assertion violations. For this reason, many of the features of the Validator launch screen are identical to those of Tester. When this is the case, the descriptions below are very brief; more detail may be found in The Tester Launch Dialog section.
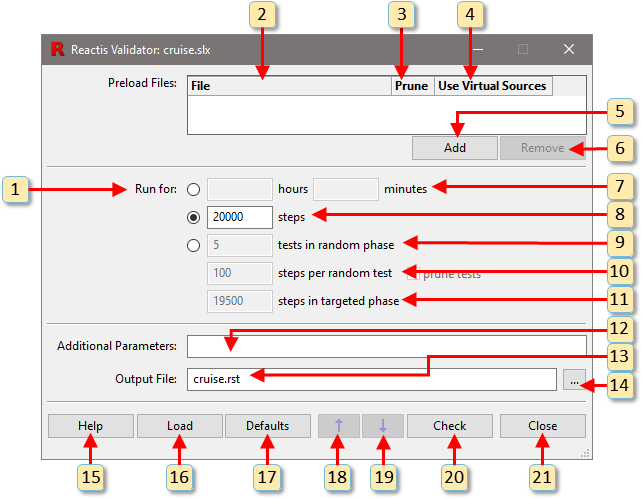
Fig. 10.14 The launch dialog for Validator.#
10.5.1. Labeled Window Items#
Specify how long Validator should run. There are three options to choose from:
A fixed amount of time
A fixed number of steps
A specified number of random and targeted tests/steps.
If 100% coverage of all targets is reached prior to the specified run time, Validator will terminate early. Note that for calculating this early termination, assertions are considered uncovered if they have not been violated. Therefore, if any assertion remains not violated, then early termination will not occur.
A list of
.rstfiles containing test suites to be preloaded.When the Prune check-box to the right of a filename is checked, unnecessary steps (those that do not increase the level of coverage) will be pruned from the preloaded test suite. When the check-box is not checked, no pruning of the suite will occur. Note, that assertions are checked for all steps of the preloaded tests. If a violation is found in a step, it will not be pruned.
If the Use Virtual Sources check-box is checked for an .rst file, then when executing the tests in the preloaded suite, values produced by enabled virtual sources will be used for controlled inputs instead of the input values from the test suite for those inputs. When this item is not checked, input values from the test suite will be used for all inputs.
Clicking this button invokes a file-selection dialog that enables the user to specify an
.rstfile to be added to the preload list.Clicking this button removes the currently selected
.rstfile from the list of test suites to be preloaded.When running Validator for a fixed length of time, the number of hours and minutes is entered here.
When running Validator for a fixed number of steps, the number of steps is entered here. Validator will decide how many of these steps will be random or targeted. Because of pruning, the number of steps in the final test suite will typically be less than the number entered here.
When running Validator for a specified number of random and targeted steps, the number of tests in the random phase is entered here. Because of pruning that occurs at the end of the random phase, some tests may be eliminated entirely, leading to a smaller number of tests at the end of the random phase than what is specified here.
When running Validator for a specified number of random and targeted steps, the number of steps to take while constructing each test of the random phase is entered here. Upon completion of the random phase, unimportant steps are pruned from the tests, so the lengths of the final tests will usually be shorter than the length specified here.
Note
Specifying too many steps in the random phase can cause Reactis to run out of memory. The upper bound on the number of steps possible depends on model size and available RAM, but in general much more time should be spent in the targeted phase which is more optimized for memory usage.
When running Validator for a specified number of random and targeted steps, the number of execution steps to take during the targeted phase is entered here. The targeted phase uses sophisticated strategies to guide the simulation to exercise parts of the model not visited during the preload or random phases. The value entered specifies an upper bound on the number of simulation steps executed during the targeted phase.
This entry box enables the user to pass one or more of the following parameters to Validator :
-a1turns inputs abstraction on,-a0turns inputs abstraction off. Inputs abstraction usually improves the performance of Validator and should be left on (default). In rare cases, turning it off may improve coverage. If coverage problems are encountered with inputs abstraction on, it may be beneficial to take a test suite produced with abstraction on, preload it into Validator, turn abstraction off, and then run Validator again.-cnsets the maximum number of input variables that may change during an execution step ton, which must be a positive integer. The default is that every input variable can change at every step. Restricting the number of input variables that can change can lead to easier-to-understand test suites.-Cndirects Reactis to use n cores during test generation. Currently supported values for n are 1 and 2. Leveraging multi-core architectures speeds up test-generation for many models.-s randomSeedseed for the random number generator. This is useful for replaying a previous run of Validator. The random seed used to create a.rstfile can be found in the test-suite log (which may be viewed in the Test Suite Browser described in The Reactis Test-Suite Browser chapter), after the “-s” in the Created by Tester: line.
The name of the
.rstfile to be generated.Clicking this button opens a file-selection dialog for specifying the name of the
.rstfile to be generated.Clicking this button displays Validator help.
Clicking this button opens a file selection dialog to specify an
.rtpfile from which to load Validator launch parameters. Reactis may be configured from the Settings dialog to generate an.rtpfile for each Tester or Validator run.Reset the Validator parameters to their default values.
Scroll backward in the parameter history.
Scroll forward in the parameter history.
Clicking this button starts Validator run.
Clicking this button closes the Validator window.
The Progress Dialog displayed while Validator is running is the same as the Progress Dialog for Tester. For more information see The Progress Dialog section.
10.7. Tracking Coverage Within Validator Objectives#
Reactis tracks any coverage targets located within diagram objectives, but does not track any targets within expression objectives. Since a diagram objective is implemented as a Simulink / Stateflow model it can contain any of the coverage targets that Reactis tracks (e.g. branches, decisions, MC/DC targets, etc.). By default Reactis will treat these targets exactly as it treats targets within your model, i.e. they will be included in all coverage reporting and Reactis Tester will try to exercise them. By examining which coverage of targets within an objective were exercised you can determine how close testing came to violating an assertion or covering a UDT.
However, in some cases you might want to turn off this tracking of targets within objectives. For example, when generating a final report, you may prefer to see the only the statistics for covered targets within your model. You can turn off this tracking from the Coverage Metrics pane of the Info File Editor with the setting named Track coverage for contents of Validator Objectives.
