20. Model Comments#
Model Comments are block-like objects that contain (textual) comments. These
comments are not stored in the .slx file, instead they are stored in the .rsi
file, similar to the way Validator objectives are stored. This gives you a
mechanism for annotating the model under test without making any changes to the
model itself.
When viewing a model in Reactis, model comments appear as a yellow rectangle with the upper right corner folded. You can do the following with model comments:
Create a new comment in any subsystem of a model.
View a comment which was previously added.
Edit and make revisions to a comment.
Move or resize a comment.
Cut, or Copy a comment to the clipboard.
Paste a comment from the clipboard.
Remove a comment.
20.1. Adding a Comment#
To add a comment, right click in empty space in the main panel to open a popup menu, then select Add Comment…. This will open an instance of the Comment Editor, which will be similar in appearance to Figure Figure 20.1.
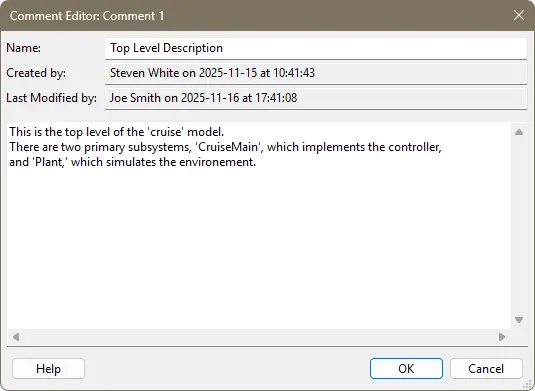
Fig. 20.1 The Comment Editor.#
There are four values displayed in the main panel of the Comment Editor:
Name. The name of the comment. This is optional and can be left empty. Comment names are not required to be unique.
Created by. The user who created the comment and the time when it was created. This is automatically filled in by Reactis and cannot be changed. The user name is taken from Reactis’ global settings.
Last Modified by.The user who last modified the comment and the time when it was modified. This is automatically filled in by Reactis and cannot be changed. The user name is taken from Reactis’ global settings.
The comment text. The large area directly above the buttons contains the comment text, and has scrollbars so that large comments may be entered.
There are two ways to close the Comment Editor. Click on OK if you are satisfied with the comment and want to save it. Click on Cancel to close the editor without saving.
20.2. Viewing Comments#
Once a comment has been created, it will appear as a sticky note at the point where you right clicked. To quickly view the comment, hover over it with the mouse and a tooltip will appear with comment text, as shown in Figure Figure 20.2. Note that when the comment is viewed this way, it will be clipped if it is large.
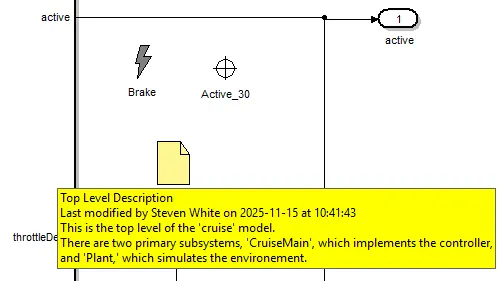
Fig. 20.2 Viewing a comment by hovering over it.#
You can also view the comment by double-clicking on it or right-clicking on it and selecting Edit Comment…. This will open the Comment Editor. You can then see the entire comment in the editor, and close the editor when you are finished reading the comment.
20.3. Editing Comments#
To edit a comment, right click on it and select Edit Comment… from the pop up menu. This will open the Comment Editor. In the editor, can change the name and text of the comment as desired, then click on OK to save the changes, or Cancel to close the editor without saving.
20.4. Moving and Resizing Comments#
To move a comment within the current displayed subsystem, left click on it to select it, then and drag it to a new spot while holding the left button down. When you release the button the comment will be stay at the current location.
To resize a comment, first left click on it. This will cause a blue border to appear around the edges of the comment. This border will include eight blue squares, one on each corner and one in the middle of each border. Next, hover over one of the eight blue squares until the cursor changes to two arrows pointing in opposite directions. To shrink the comment, left click and drag the square towards the center of the comment. To grow the comment, drag the square away from the comment.
Dragging a corner square will shrink or expand both dimensions of the comment. Dragging a square in the middle of a side will grow or expand only one dimension of the comment.
20.5. Copying, Cutting, and Pasting Comments#
If you want to move a comment to a different subsystem, you will need to cut the comment from its current subsystem, then navigate to the subsystem where you want to place the comment and paste it there.
To copy a comment to the clipboard, right click on and select Copy from the pop up menu that appears. This will copy the comment to the clipboard.
To cut a comment from the model, right click on it and select Cut from the pop up menu. This will copy the comment to the clipboard and remove it from the model.
To paste a comment from the clipboard, right click on the location where you want the comment to appear and select Paste from the pop up menu. This will create a comment identical to the comment stored in the clipboard, with the exception that the time of last modification and the user name who performed the last modification will be updated.
Note that you can paste as many copies of a comment as you wish.
20.6. Removing Comments#
To remove a comment, right click on it and select Remove from the pop up menu.
The comment will disappear from the main panel and removed from the .rsi file.
20.7. Undoing Changes to a Comment#
All comment changes can be undone by clicking on the Undo icon in the toolbar.
Comment changes which were previously undone can be restored by clicking on the
Redo icon. When the .rsi file is saved, all changes become permanent and cannot
be undone, so be careful when saving the .rsi file.
20.8. Comment ID Numbers#
Reactis automatically assigns a unique ID number to each comment. These are used to identify comments which would otherwise be identical. When a comment is edited, the ID number is displayed in the title bar of the Comment Editor.