9. Reactis Tester#
Reactis Tester generates tests automatically from Simulink / Stateflow models. Each test consists of a sequence of stimulus / response pairs, where each stimulus assigns an input value to each harness inport of the model and each response records an output value for each harness outport. The tests may be run on Simulink / Stateflow models using either Reactis Simulator or the Simulink simulation environment of The MathWorks, Inc. The tests may also be used to drive testing of source code implementations of models as described in the Executing Tester-Generated Test Suites chapter.
A collection of tests generated by Tester is termed a test suite. Test suites are intended to maximize coverage for the different metrics defined in the Reactis Coverage Metrics chapter while minimizing the total number of execution steps in the overall suite. The remainder of this chapter describes the workings of Tester.
9.1. The Tester Launch Dialog#
Figure 9.1 contains an annotated screen shot of the Tester launch dialog, which may be invoked from the Reactis top-level window using the Test Suite > Create… menu item. This section describes the labeled items in the figure.
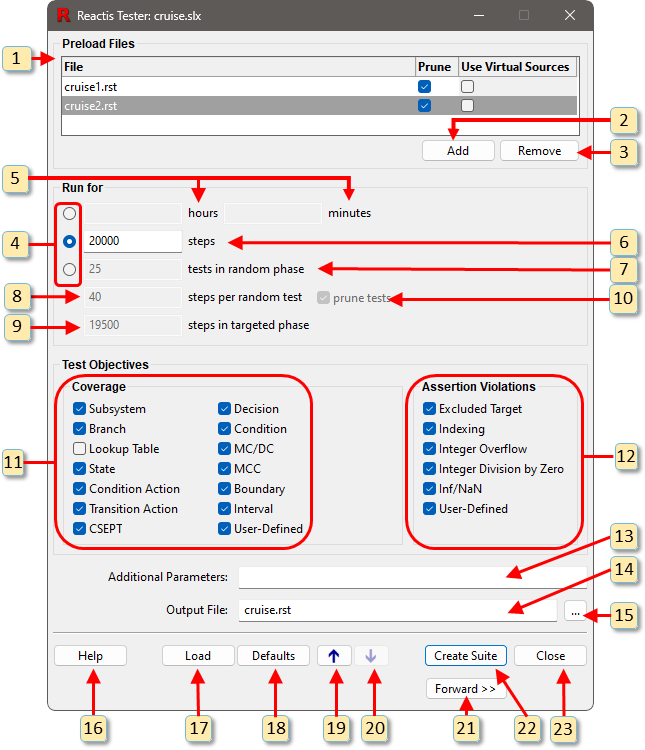
Fig. 9.1 The Reactis Tester launch dialog.#
The Preload Files section lets you optionally specify a list of test suites to be executed before generating new test data. The coverage achieved by the preloaded tests will be tracked and subsequently generated tests will aim to exercised targets not covered by the preloaded tests. If no preload suites are given, new test data will be generated from scratch.
When the check-box column to the right of a file name titled ‘Prune’ is checked, unnecessary steps (those that do not increase the level of coverage) will be pruned from the ends of tests in the preloaded suite. When the check-box is not checked, no pruning of the suite will occur. When the check-box column titled ‘Use Virtual Sources’ is checked, the Virtual Source signals that are mapped to specific inports of the current model will be used, rather than the inport signals stored in the named .rst file. Signals which have no virtual source mapping will be derived from the .rst file, as usual.
Clicking this button invokes a file-selection dialog that enables you to specify an
.rstfile to be added to the preload list.Clicking this button removes the currently selected
.rstfile from the list of test suites to be preloaded.Specify how long Tester should run. There are three options to choose from:
A fixed amount of time
A fixed number of steps
A specified number of random and targeted tests/steps.
When running Tester for a fixed length of time, the number of hours and minutes is entered here. If 100% coverage of all targets is reached prior to the time limit, Tester will terminate early.
When running Tester for a fixed number of steps, the number of steps is entered here. Tester will decide how many of these steps will be random or targeted. Because of pruning, the number of steps in the final test suite will typically be less than the number entered here.
When running Tester for a specified number of random and targeted steps, the number of tests in the random phase is entered here. Because of pruning that occurs at the end of the random phase, some tests may be eliminated entirely, leading to a smaller number of tests at the end of the random phase than what is specified here.
When running Tester for a specified number of random and targeted steps, the number of steps to take while constructing each test of the random phase is entered here. Upon completion of the random phase, unimportant steps are pruned from the ends of tests, so the lengths of the final tests will usually be shorter than the length specified here.
Note
Specifying too many steps in the random phase can cause Reactis to run out of memory. The upper bound on the number of steps possible depends on model size, but in general much more time should be spent in the targeted phase which is more optimized for memory usage.
When running Tester for a specified number of random and targeted steps, the number of execution steps to take during the targeted phase is entered here. The targeted phase uses sophisticated strategies to guide the simulation to exercise parts of the model not visited during the preload or random phases. The value entered specifies an upper bound on the number of simulation steps executed during the targeted phase.
In order to minimize test suite size, Tester usually prunes random tests after the random phase, removing any steps at the end of a test that do not cover any new targets. Unchecking this option will skip the pruning operation such that all random tests will be added to the test suite in their full length.
The Coverage section enables you to specify the coverage metrics used to guide test generation. Each coverage metric defines a set of target elements in models to exercise. The metrics supported by Tester are described in the Reactis Coverage Metrics chapter.
The Assertion Violations section lets you specify the assertion categories for which Tester will attempt to find input sequences that lead to assertion violations. The assertion violation categories are described in the Run-Time Error Assertions section.
This entry box enables you to pass one or more of the following parameters to Tester :
-a1turns inputs abstraction on,-a0turns inputs abstraction off. Inputs abstraction usually improves the performance of Tester and should be left on (default). In rare cases, turning it off may improve coverage. If coverage problems are encountered with inputs abstraction on, it may be beneficial to take a test suite produced with abstraction on, preload it into Tester, turn abstraction off, and then run Tester again.-c nsets the maximum number of input variables that may change during an execution step ton, which must be a positive integer. The default is that every input variable can change at every step. Restricting the number of input variables that can change can lead to easier-to-understand test suites.-s randomSeedseed for the random number generator. This is useful for replaying a previous run of Tester. The random seed used to create a.rstfile can be found in the test-suite log (which may be viewed in the Test Suite Browser described in The Reactis Test-Suite Browser chapter), after the “-s” in the Created by Tester: line.
The name of the
.rstfile to be generated.Clicking this button opens a file-selection dialog for specifying the name of the
.rstfile to be generated.Clicking this button displays Tester help.
Clicking this button opens a file selection dialog to specify an
.rtpfile from which to load Tester launch parameters. Reactis may be configured from the General pane of the Info File Editor to generate an.rtpfile for each Tester or Validator run.Reset the Tester launch parameters to the default values Reactis ships with.
Scroll backward in the parameter history.
Scroll forward in the parameter history.
This button is visible only if you went back to this screen by clicking the Back button in the Tester progress/results dialog. Clicking it will bring back the progress/results dialog with its previous results.
Clicking this button starts test-suite generation.
Clicking this button closes the Tester launch dialog without starting test-generation.
9.2. The Progress Dialog#
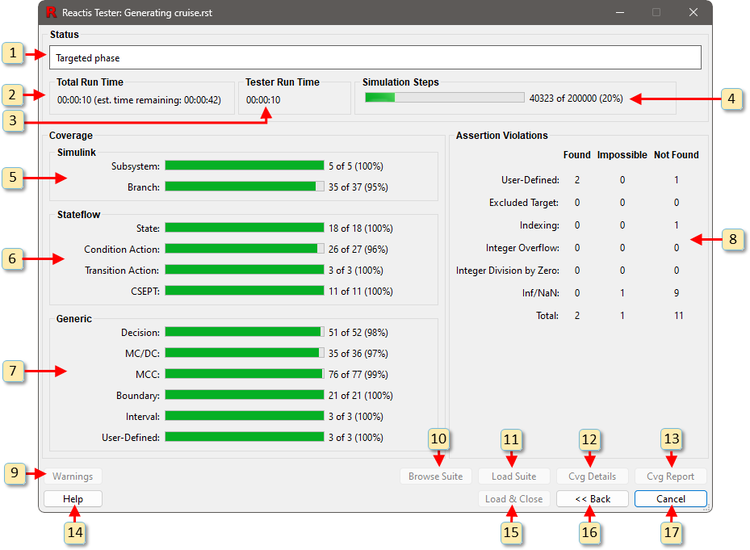
Fig. 9.2 The Reactis Tester progress dialog.#
The Tester progress dialog, shown in Figure 9.2, is displayed while Tester is running. What follows describes the labeled items in the figure. When Tester completes, buttons 9–13 become enabled.
Status message describing current Tester activity.
Time elapsed (real time) since start of test generation, and estimated time until test generation completes.
Current amount of CPU time used by Tester.
Total number of simulation steps to be taken during test generation, and the percentage thereof taken so far. Note that since many steps are pruned from final test suite, this number will typically be much larger than the cumulative number of execution steps in the generated test suite.
Progress bars that report percentages of reachable targets covered for Simulink-specific coverage metrics. These metrics are described in the Simulink-Specific Metrics section.
Progress bars that report percentages of reachable targets covered for Stateflow-specific coverage metrics. These metrics are described in the Stateflow-Specific Metrics section.
Progress bars that report percentages of generic (applying Simulink, Stateflow, and C code) coverage metrics. These metrics are described in the Generic Metrics section.
Progress bars that report percentages of assertions for which violations have been found for each assertion category. Assertion categories are described in the Run-Time Error Assertions section.
When warnings occur, this button may be clicked to view descriptions of the warnings.
Open the Reactis Test Suite Browser and load the newly generated test suite.
Enable Reactis Simulator and load the newly generated test suite.
View the model with coverage information for the newly generated test suite represented by highlighting the diagram elements of the model.
View the model with coverage information for the newly generated test suite in the Coverage-Report Browser.
View help for the progress dialog.
Enable Reactis Simulator, load the newly generated test suite, and close the Tester results dialog.
Go back to the Tester launch dialog.
Interrupt test generation and write the tests generated so far to an
.rstfile.