3. Working with TargetLink-Generated Code in Reactis for C#
dSPACE TargetLink’s main purpose is to generate native C code from models which use the TargetLink block set. Reactis can analyze TargetLink models to create comprehensive test suites. Reactis for C (a separate product) can take the test suite generated for the model and run it directly on the C code, as part of a comprehensive back-to-back testing process.
Before TargetLink-generated code can be tested in Reactis for C, it must be loaded and configured for testing. The process for loading and configuring the code has four steps:
Generate C code using settings which are compatible with Reactis for C.
Export the C code.
Load and compile the C code in Reactis for C.
Create a test harness.
3.1. Generating Reactis-Compatible C Code in TargetLink#
To generate suitable C code for testing with Reactis for C, do the following:
Make sure the TargetLink model runs successfully in Model-In-the-Loop (MIL) mode in TargetLink.
(Optional) Make sure the TargetLink model runs successfully in Software-In-the-Loop (SIL) mode. This confirms that the code can be generated from the model, and that any supporting C files have been located, and that a linkable construct has been built.
Select the option Do not log anything in the Simulation Frame Options window of the TargetLink main dialog.
Select the option Clean Code in the Code and Logging Section of the TargetLink main dialog.
3.2. Exporting the TargetLink C Code#
After code has been generated, use the command tl_export_files in MATLAB to create a directory which will contain all source files needed to test the code in Reactis for C. This will make it easy to find the source files for library functions that called by the TargetLink-generated code. The following settings are recommended:
Set Target/compiler to HostPC64/MSVC
Copy system files should be checked.
3.3. Loading the Code in Reactis for C#
After exporting the code to a directory (which we will refer to as export henceforth),
the next step is to load and compile the code in Reactis for C in preparation for testing.
The export directory should contain the following:
Several
.cand.hfiles. These contain the code generated from the model.A subdirectory
includewhich contains header files needed to compile the code.A subdirectory
lib/srcwhich contains a directory for each library. For example, fixed point library code is typically stored inlib/src/dsfxp.
In order to load the code in Reactis for C, one or more Reactis build files (.rsm file)
are required. An .rsm file includes the following information:
The C source files generated from the model
The location of secondary
.rsmfiles for any additional libraries referenced from the C codeThe search path for finding header files during preprocessing.
Any macro definitions required to compile the C code.
See the Reactis for C User Guide
for more information on how to create and edit .rsm files.
When testing TargetLink-generated code in Reactis for C, the recommended best practice is to create
a separate .rsm file for each library in addition to the
build file for the generated code. This will structure the code
in a comprehensible manner and also let you easily disable coverage tracking
in the library code if desired.
The first step is to create a top-level .rsm file, which will list the
primary source files and contain links to the build files for each library.
The following elements should be added to the top-level build file:
Source Files: All
.cfiles in the export directory (do not add files in subdirectories). An example is shown in Figure 3.1.Include Search Path: The export/include directory and the export directory itself. An example is shown in Figure 3.2
Defines: Can typically be left empty. The
exportdirectory should contain a file with a.mkextension which you can check for macro definitions.
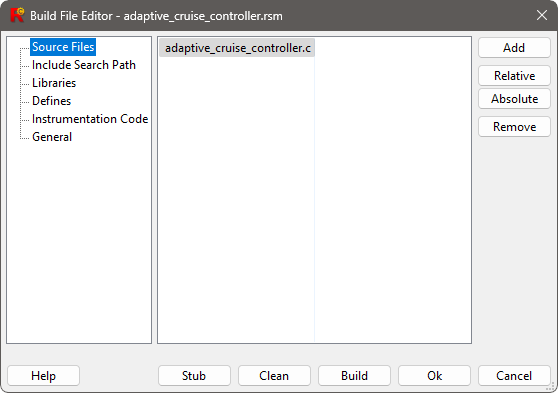
Fig. 3.1 A .rsm file with a C source file generated by TargetLink.#

Fig. 3.2 A .rsm file with a typical search path for C code generated by TargetLink.#
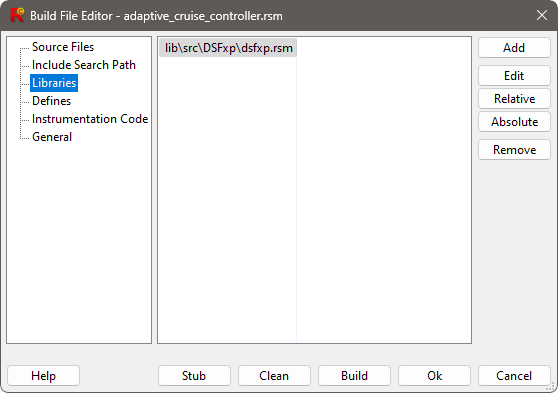
Fig. 3.3 A .rsm file which uses TargetLink library code.#
After the above components have been completed, the library build files must be created. To do this, select the Library tab in the Reactis Build File Editor and perform the following steps for each library:
Click the Add button.
Navigate to the subdirectory containing the library code and enter a name for the library
.rsmfile. Agree to create the.rsmfile when prompted.
Configure each library .rsm file as follows:
Source Files: All
.cfiles in the library subdirectory. An example is shown in Figure 3.4.The ‘export’ and ‘export/include’ directories. An example is shown in Figure 3.5.
Defines: These can typically be left empty.
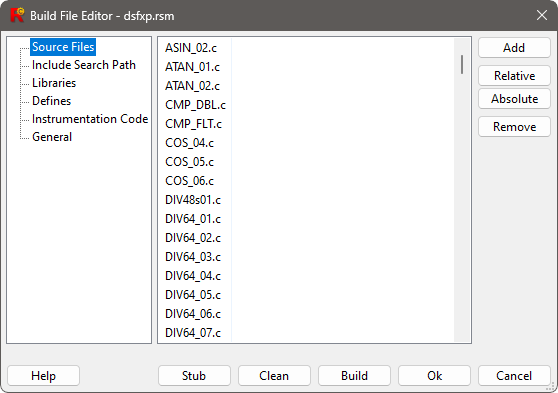
Fig. 3.4 A .rsm file with library code exported by TargetLink.#

Fig. 3.5 A .rsm search path for library code exported by TargetLink.#
After configuring the library .rsm file, you should use the Build button to ensure that
the library compiles correctly, then close the library .rsm file. This will return the
focus to the top-level .rsm file. When all libraries have been added, you can use the
Build button to compile the generated code and link it with the libraries.
3.4. Creating a Test Harness#
Once the build file is configured, the final step required before testing can proceed is to create a test harness for the C code which matches the model, so that test suites can be freely interchanged between code and model. This requires the following steps:
In the Reactis main window, select Edit > New Harness… A Create Harness dialog similar to the one shown in Figure 3.6 will appear.
In the Create Harness dialog, use the … button on the row labeled Entry Function and select the step function from the list of available functions (alternatively, you can enter the name directly).
If the code has an initialization function, enable it using the radio button next to Initialization Function and either enter the name or use the … button to select from the list of available functions.
Enable Create Harness from RSI File and enter or select the
.rsifile which is used in Reactis for Simulink to test the model.In the Variable Renaming add any prefix added by TargetLink. In Figure 3.6 the prefix added by TargetLink is
Sa1_.
After the harness has been successfully imported, the Reactis for C main window should
look similar to the screenshot in Figure 3.7 when the
top-level .rsm file is selected.
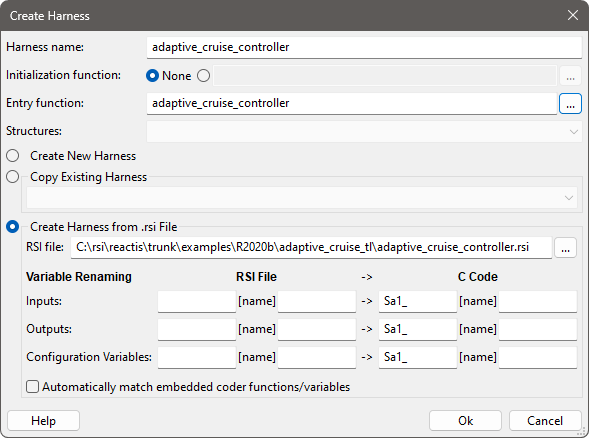
Fig. 3.6 The dialog to import a test harness from a model for use with C code.#
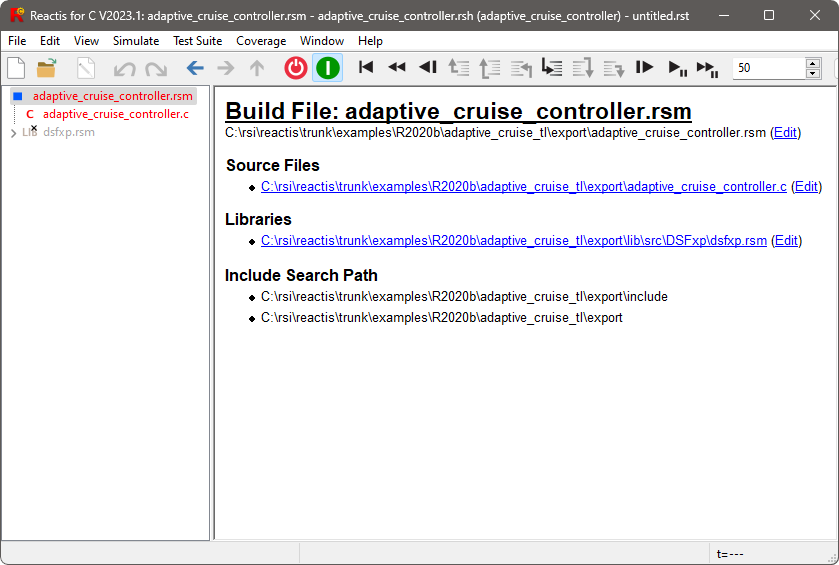
Fig. 3.7 Reactis for C with TargetLink code loaded and ready to test.#
3.5. Comparing Behavior of Generated Code to Model#
Since Reactis generates a test suite from the model that is the same format used by Reactis for C, it is very easy to compare the C code behavior against the original model from which it was generated. In describing the comparison method, assume the following:
A.slxis a TargetLink model.Reactis Tester is used to generate test suite
TS.rstfromA.slx.B.rsmis the TargetLink-generated C application generated fromA.slxwhich has been loaded in Reactis for C as described in [Loading the Code in Reactis for C] (rfc-loading-code).B.rshis a harness library which includes a test harness that matches the inputs and outputs of the model. This harness will typically be imported from the model as described in Creating a Test Harness.
The following steps let you execute B.rsm using inputs from the test suite TS.rst.
As TS.rst is executed, any output differences between the output produced by
A.slx and B.rsm will be flagged. In addition, runtime errors such as overflows
may be flagged. Exactly which errors are flagged depends on the error checking settings.
Start Simulator (click the green button in the Reactis for C toolbar).
Load
TS.rstin Simulator by selecting menu item Test Suite > Open… and selecting fileTS.rst.Select Simulate > Fast Run with Report… to run the tests stored in
TS.rstand generate an HTML report. This report will list any differences in behavior betweenB.rsmandA.slx.For each difference found, a test and step N will be reported. To diagnose the issue, run
A.slxto step N in Reactis Simulator and runB.rsmto step N in Reactis for C.
3.6. Model/Code Co-simulation#
The V2024 release of Reactis for Simulink and Reactis for C added support for co-simulation of TargetLink models and generated code. Individual Reactis for Simulink and Reactis for C sessions can linked in co-simulation mode so that a TargetLink model and the code generated from that model can be explored and simultaneously executed.
When co-simulation mode is enabled, Reactis parses the comments inserted into the C source code by TargetLink and builds a map between code and model components. The process to link a Reactis for Simulink session with a Reactis for C session is relatively simple and is covered in both the Reactis User Guide and Reactis for C User Guide. Once a Reactis for Simulink session has been linked with a Reactis for C session, you can do the following:
Click on a model item (block or Stateflow state or transition) to highlight the corresponding C code.
Click on a line of C code to highlight the corresponding model items.
Set a breakpoint in the model to set breakpoints on on corresponding C code.
Set a breakpoint on a line of C code to set breakpoints on corresponding model items.
Figure 3.8 and Figure 3.9 show parallel Reactis for Simulink and Reactis for C sessions which are linked in co-simulation mode. In Figure 3.8, Reactis has highlighted a block in the model which corresponds to the line of code highlighted in Figure 3.9.
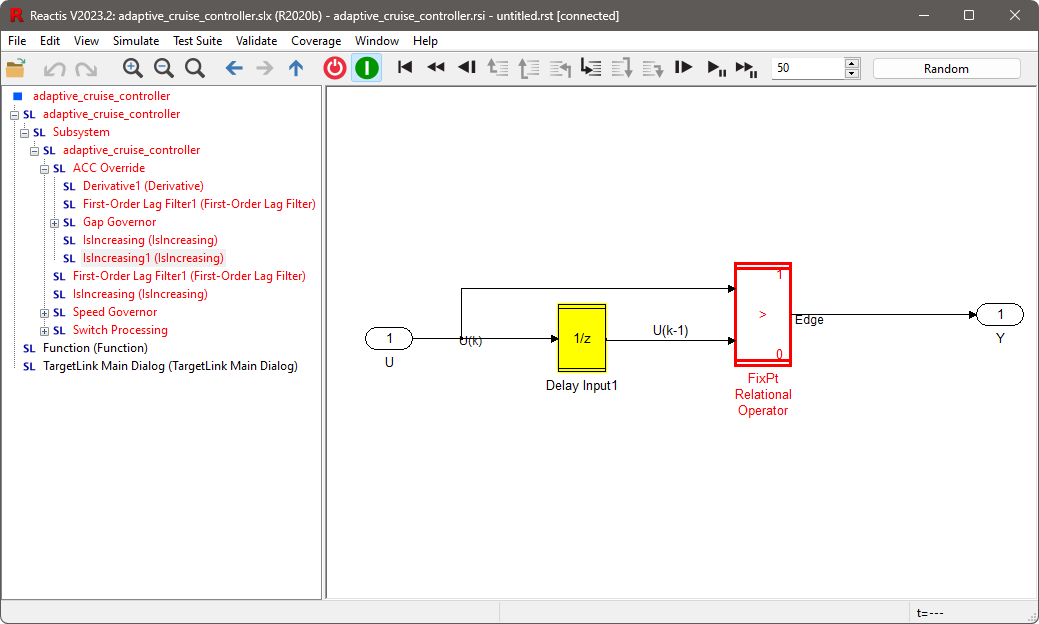
Fig. 3.8 Highlighting a block in Reactis. In co-simulation mode, the corresponding code is highlighted in Reactis for C.#
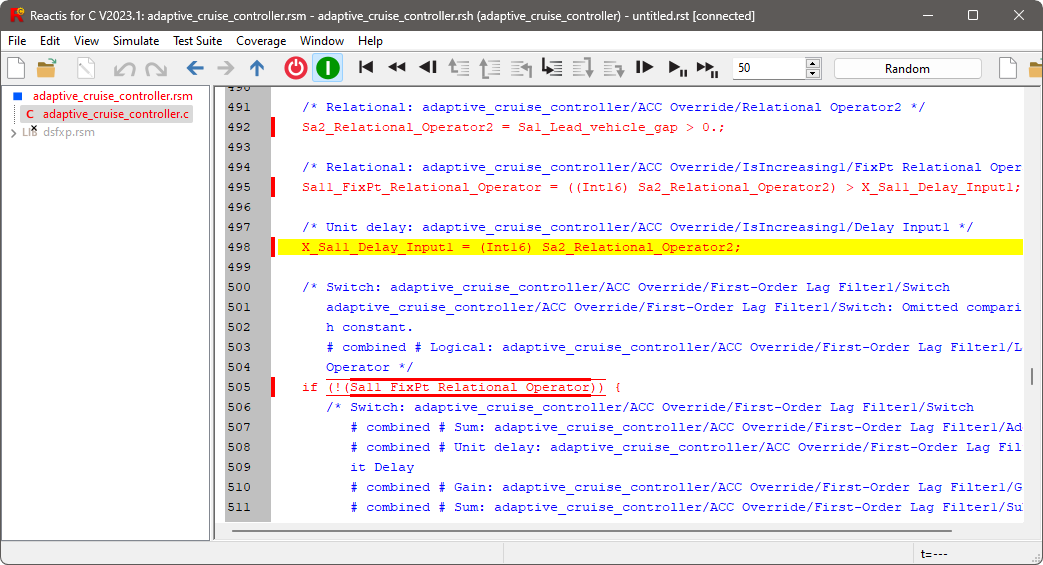
Fig. 3.9 Highlighting a line of code in Reactis. In co-simulation mode, the corresponding block is highlighted in Reactis for Simulink.#