2. Working with TargetLink Models in Reactis#
Some preparation steps are necessary before working with a TargetLink model in Reactis. After performing these steps, users can manipulate TargetLink models in Reactis in the same way native Simulink models are processed. In particular, once a TargetLink model has been prepared, the following tasks can be performed:
Generate tests from a model with Reactis Tester.
Simulate and debug models in Reactis Simulator.
Check that a model meets its requirements with Reactis Validator.
Reactis is compatible with a most TargetLink versions (including versions 3.0 through 2023-B). Most of the model-preparation steps are similar for the different versions.
2.1. Reactis-Friendly TargetLink Settings#
A few TargetLink settings may need adjustment before working with a model in Reactis. We describe those settings in this section.
2.1.1. Activating MIL Mode#
In order to work properly with Reactis, TargetLink models should be set to Model-in-the-Loop (MIL) mode. If the simulation mode is set to Software-in-the-Loop (SIL), or Processor-in-the-Loop (PIL), it may not function properly in Reactis. The following steps will set your model to use MIL mode:
Double-click on the TargetLink block at the top of your model to open the TargetLink Main Dialog.
In the Code Generation tab, click the button labeled Activate MIL.
2.1.2. Disabling Block Logging#
TargetLink provides a useful mechanism for logging and graphing the output signals of blocks selected by the user. During or shortly after a simulation (depending on the version of TargetLink) a window with graphs will appear that displays the selected signals. This feature is not compatible with Reactis, so to work with your model in Reactis, you should disable it as follows:
Open the TargetLink Main Dialog. (This can be done by double-clicking on the TargetLink block at the top of your model.)
In the Code Generation tab, select Do not log anything as the Global logging option.
This will make it impossible to view the graphs generated by TargetLink. Fortunately, Reactis provides alternative ways to view signal graphs when running a model in Reactis Simulator.
2.1.3. TargetLink Full-Featured and Stand-alone Installations#
dSPACE offers two ways to install TargetLink on your computer: full-featured and stand-alone.
The full-featured version is intended to be used in the main TargetLink environment when the objective is code generation or Software-in-the-Loop (SIL) simulation.
The stand-alone installation enables users to simulate TargetLink models in the Simulink environment, but not generate code or access many of the advanced TargetLink features. Use of the stand-alone installation does not require a TargetLink license.
Reactis is compatible with both the full-featured and the stand-alone block sets.
2.2. TargetLink-Friendly Reactis Settings#
There are also some Reactis settings which will make life easier when working with TargetLink models. These settings are explained in this section.
2.2.1. Selecting the MATLAB Version in Reactis#
For best results, the MATLAB version used by Reactis should be the same MATLAB version used to create the model under test. If a different version is used, there is the potential for errors when loading the model (for example, if TargetLink has not been integrated with the version of MATLAB selected in Reactis). Reactis can be configured to use a specific version of MATLAB/Simulink as follows:
Start Reactis for Simulink.
Select File > Global Settings…
In the resulting Global Settings dialog, select the MATLAB tab and then select the appropriate MATLAB version using the pull-down menu.
Click OK to dismiss the Global Settings dialog.
2.2.2. Configuring the Reactis Path#
Like MATLAB, Reactis maintains a path variable consisting of a list of folders to be searched for various files used by a model. These files include libraries, including the TargetLink libraries. Unlike MATLAB, Reactis maintains both a global and a model-specific path. The model-specific path is prepended to the global path to construct the full search path used with a model.
When using Reactis with TargetLink, we recommend updating the model-specific path to include the folders containing the TargetLink libraries. The following steps set the model-specific path:
Make sure the model loads and simulates properly in the Simulink environment.
Start Reactis for Simulink and load the model.
Select Edit > Search Path…
Click the Import button. This will cause Reactis to:
- load the model in Simulink (executing any initialization files that might update the path),
- query Simulink for the resulting path for the model,
- add the returned MATLAB path to the model-specific Reactis path for the model.
Select File > Save to save the updated path into the
.rsifile maintained by Reactis for the model.
The model-specific path should now include the dSPACE directories required to simulate a TargetLink model. The model-specific path will be saved, so it is not necessary to import the path a second time for the same model unless a change is made which affects the search path.
2.2.3. Enable Propagate set_param changes#
Some TargetLink blocks have attributes that are dynamically updated after
the model is loaded. Models using these self-modification methods
(e.g. set_param, add_block, etc.) can cause problems
if Reactis does not see the changes made by them. To avoid these
issues, Reactis has a setting that should be turned on when working
with TargetLink models.
The setting is named Propagate set_param changes by saving the model to a temporary file. It can be enabled as follows:
Load your model in Reactis for Simulink.
Select Edit > General…
In the resulting dialog, ensure the box labeled Propagate set_param changes by saving the model to a temporary file is checked.
When this setting is enabled, Reactis will:
Invoke Simulink/TargetLink to apply the changes to the model,
Automatically save changed model to a temporary file,
Import the temporary model file, allowing Reactis to see the applied changes.
All of this happens invisibly without any need for interaction from the user.
2.3. Configuring Inport Types#
To avoid overflows and improve test coverage, Reactis should be configured to provide inputs within the range expected by the generated code. These ranges can be automatically defined as follows:
Make sure the model loads and simulates properly in the Simulink environment.
Start Reactis for Simulink and load the model.
Select Edit > Inport Types…
A dialog may appear asking for permission to retrieve the inport types from the model. If this dialog appears, click the OK button. Retrieving the types may take a minute or two.
Select Tools > Synchronize inport ranges with TargetLink data dictionary.
The inport types will have range and resolution constraints based on the type that the inport will have in the code generated by TargetLink. These constraints can be adjusted by editing the inport type if desired.
2.4. Pitfalls to Avoid#
2.4.1. Nonstandard Switching Between TargetLink Versions#
In earlier releases, each TargetLink version mapped to one distinct MATLAB[1] installation. To switch mapping, the dSPACE Installation Manager required a system reboot to complete the activation. Some users created backdoor scripts to more quickly switch between installations of TargetLink. Unfortunately, these scripts are not compatible with Reactis, so the user should use the normal TargetLink activation procedure through dSPACE Installation Manager. In later versions of the dSPACE Installation Manager, switching between TargetLink versions is unnecessary in most circumstances, and otherwise very quick.
2.4.2. Incidental TargetLink Dialogs#
Because Reactis reads and interprets TargetLink models, occasionally a TargetLink dialog may appear that requires user interaction. Often the user will only need to close the dialog or click OK. But it is important the user remain attentive to these dialogs as they may suspend further processing of the model until the dialog is closed. For example, if the data dictionary could not be found, a dialog similar to one shown in Figure 2.1 might appear, and Reactis would remain frozen until the dialog is completed.
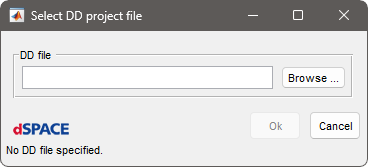
Fig. 2.1 A TargetLink dialog which could appear while using Reactis.#
2.5. TargetLink Custom Code Blocks#
In addition to enhanced versions of most Simulink blocks, TargetLink provides a Custom Code block, which allows insertion of user-supplied C code into the Simulink simulation environment. Because these blocks implement S-Function-wrapped C code, they can be executed in Reactis, and even debugged using the Reactis for C Plugin. An example is shown in Figure 2.2.
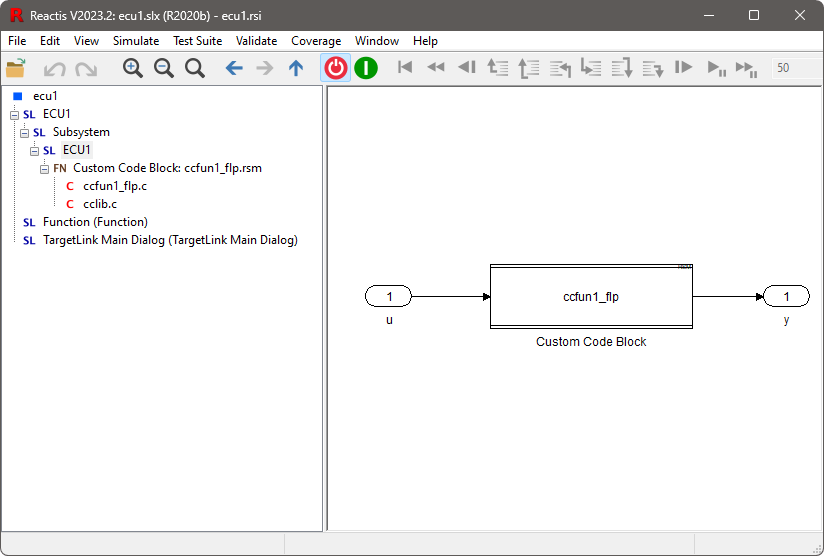
Fig. 2.2 A model which uses a TargetLink Custom Code block in Reactis.#
TargetLink Custom code blocks can be executed in block-box mode in Reactis without any
effort by the user.
To execute a block in white-box mode using the Reactis for C-Plugin,
a Reactis build file (.rsm) file must be created.
The initial steps to configure a TargetLink Custom Code block
for use with the Reactis for C-Plugin are as follows:
Make sure the model executes with the TargetLink Custom Code block in black-box mode.
Right-click on the Custom Code block (with Simulator disabled) and select Assign RSM File…
A dialog titled Makefile Editor will appear, which is used to create a .rsm file
for the custom code block. The .rsm file should be configured as follows:
In the Source Files section, add the
.cfile which TargetLink generated to implement the S-function for the custom code block. This file is typically has the same name as the block with_flp.cappended. There may also be additional source files, which typically appear as an AddFile block in the model. After adding the source files, the appearance of the Makefile Editor should be similar to Figure 2.3.In the Includes section, two TargetLink directories will need to be added so that the TargetLink S-function library code can be found. The pathnames relative to the TargetLink installation directory (
%TargetLinkDir%) are:
%TargetLinkDir%\Matlab\Tl\SimFiles\HostPC%TargetLinkDir%\Matlab\Tl\ApplicationBuilder\generic
An example include file search path is shown in Figure 2.4.
As can be seen in the screenshot, the TargetLink installation directory is C:\Program Files\dSpace TargetLink 5.1, so the full pathnames are as follows:
C:\Program Files\dSpace TargetLink 5.1\Matlab\Tl\SimFiles\HostPCC:\Program Files\dSpace TargetLink 5.1\Tl\ApplicationBuilder\generic
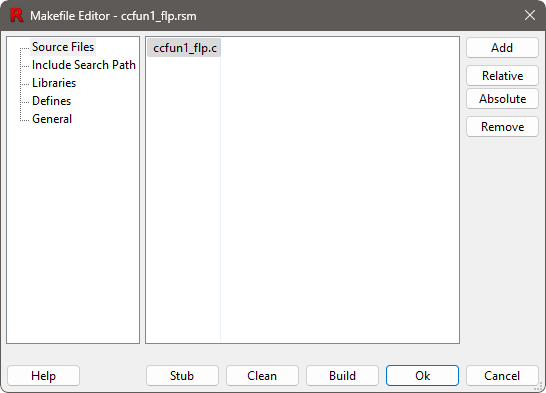
Fig. 2.3 The source for a TargetLink custom code block is often just a single file.#
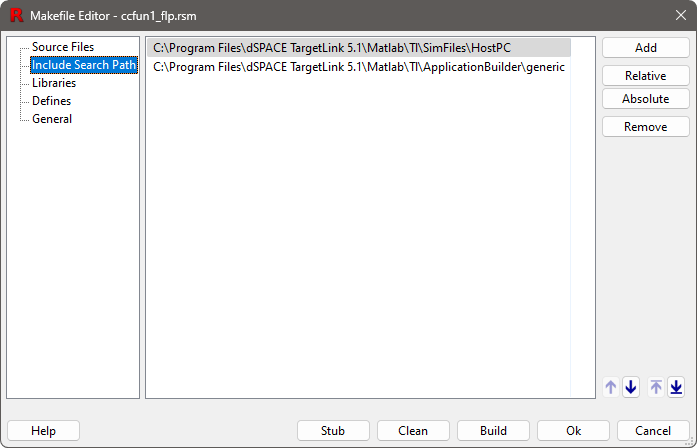
Fig. 2.4 A typical search path used to compile the .c code in a TargetLink Custom Code block.#
Once the source files and include file search path have been set, you can use the Build button to check that the code compiles correctly in Reactis. Alternatively, you can close the editor and the code will be compiled when Simulator starts. Once Simulator has started successfully, you should be able to single-step through the model and into the C code for the Custom Code block, as shown in Figure 2.5.
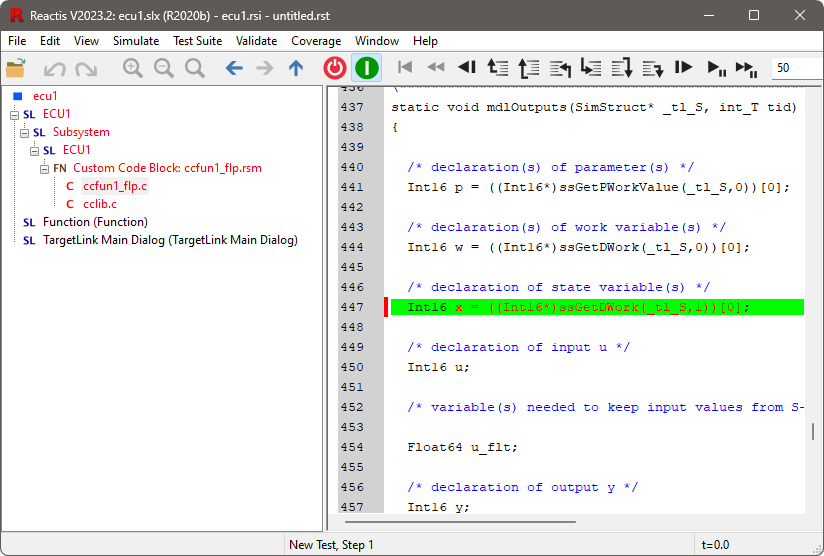
Fig. 2.5 Reactis (with the Reactis for C plugin) lets you seamlessly step from a model into the C code generated for TargetLink Custom Code block.#