5. Controlling Access to Licenses#
The V2022 release of the Reactis License Manager includes support for controlling access to licenses served. An administrator can define users and passwords, along with access rights. To access licenses served by the license manager, users must authenticate and have the appropriate permissions.
5.1. Defining Users#
The users allowed to access licenses served by the license manager are specified in a
users.txt file residing in the Reactis License Manager folder:
C:\Program Files\Reactis License Manager V2022\users.txt
The users.txt file is created and manipulated using command line utilities included in
the license manager distribution. If no users.txt file exists, then the license manager
will not require user authentication and will operate as legacy versions did prior to
V2022 of the Reactis License Manager. Furthermore, if a special user named “legacy” is
added, then older Reactis clients (prior to V2022) that do not support authentication
will be able to access any licenses allocated to the “legacy” user.
To create a user (and users.txt if it does not yet exist), do the following:
Open a Command Prompt (DOS) window in administrator mode. One way to do this is by typing cmd in the Windows task bar search, then right-clicking on Command Prompt and selecting Run as administrator.
Change the working directory in the Command Prompt Window to the license manager bin directory. The location of the bin directory is:
C:\Program Files\Reactis License Manager V2022\bin\x64
Enter the following command:
> reactisl user addThere will be a prompt to enter a username, a password, and confirmation of password.
> reactisl user add
Enter username to add: joe
Enter password for user joe:
Re-enter password for user joe:
User joe added.
This will create a users.txt file containing a user joe. Note that alternatively any
inputs requested by prompts can be given as additional arguments on the command line.
For example:
> reactisl user add joe passwdforjoe
To remove a user, use the following command:
> reactisl user remove
To see a list of information for users, from the command prompt enter:
> reactisl user list
To enable a user, use the command:
> reactisl user enable
To disable a user, use the command:
> reactisl user disable
5.2. Batches#
An rsilicense.dat license file activates the set of licenses your organization owns.
The file consists of a set of batches, where each batch specifies a product (Reactis
for Simulink, Reactis for EML Plugin, Reactis for C Plugin, Reactis Model Inspector,
or Reactis for C) and a the number of licenses for that product authorized by the batch.
Different batches may have licenses for the same product. For example, an rsilicense.dat
file might contain three batches; two of them providing access to Reactis for Simulink,
and the third one providing licenses for the Reactis for C Plugin.
5.2.1. Batches Within a License File#
Below is an example of an rsilicense.dat file.
[License]
Company=Reactive Systems, Inc.
MAC=11:AF:09:GH:98:23
ATS=1
User=Mr John Doe
Port=3999
Batches=r4sl,r4cp,r4ep,r4c

[r4sl]
Product=Reactis
Expire=3/16/2023
Type=floating-annual
LicenseId=2001,2002,2003
SupportId=3501,3502,3503
Licenses=3
Key=...

[r4cp]
Product=C-Plugin
Expire=3/16/2023
Type=floating-annual
LicenseId=2004,2005,2006
SupportId=3504,3505,3506
Licenses=3
Key=...

[r4ep]
Product=eml-plugin
Expire=3/16/2023
Type=floating-annual
LicenseId=2007,2008,2009
SupportId=3507,3508,3509
Licenses=3
Key=...

[r4c]
Product=c-standalone
Expire=3/16/2023
Type=floating-annual
LicenseId=2010,2011,2012
SupportId=3510,3511,3512
Licenses=3
Key=...
5.2.2. Assigning Batches to a User#
Assigning a batch to a user grants them access to licenses in the batch. To assign a batch to a user, use the command:
> reactisl user addbatch
To remove a batch from a user:
> reactisl user rmbatch
When a user starts Reactis and requests a license in a batch that the user is authorized
to use, a license id from the batch is assigned to and occupied by the user. A different
user cannot use the license id until it is released. The license id that a user is
occupying can be viewed from within Reactis by selecting File > Global Settings,
then selecting the License tab which displays [currently using floating license: XXX]
where XXX is the license id.
If all licenses from the batches that are assigned to the user are currently occupied by other users, then an error message will notify the user that no license is available.
Assigning batch “*” to a user gives that user access to all batches in the
rsilicense.dat file.

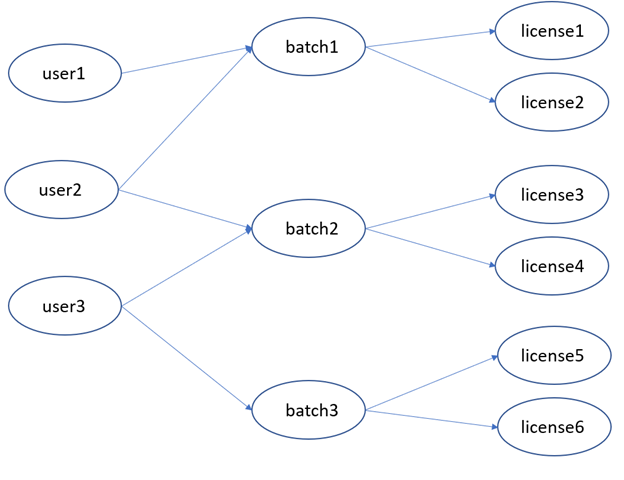
Fig. 5.1 License ids are assigned to batches and batches are assigned to users.#
5.2.3. Using License Ids as Batches#
In the rsilicense.dat file, each batch includes a LicenseId field that specifies the identifiers for the licenses that constitute the batch. Below you can see a snippet from a license file.
[r4sl]
Product=Reactis
Expire=3/16/2023
Type=floating-annual
LicenseId=2001,2002,2003
SupportId=3501,3502,3503
Licenses=3
Key=...
A license id can be assigned to a user as a special batch containing only the single license id.
5.3. Groups#
The Reactis License Manager also supports groups to facilitate access control to licenses. A group consists of a set of users in the group and a set of batches to which all users in the group have access. To create a group, use the command:
> reactisl group add
To remove a group:
> reactisl group remove
To add a batch to a group:
> reactisl group addbatch
To remove a batch from a group:
> reactisl group rmbatch
To add a user to a group:
> reactisl user addgroup
To remove a user from a group:
> reactisl user rmgroup
Note that removing all users does not delete the users.txt file.
A user has access to all batches that are assigned to them PLUS all batches that are assigned to the groups to which the user belongs.
To view information for all groups:
> reactisl group list
Group definitions are stored in a groups.txt file which is stored in the license manager
folder:
C:\Program Files\Reactis License Manager V2022\groups.txt
5.4. Import Users and Groups from .csv Files#
Another method for specifying the user and group information for access control is to
import it from .csv files.
5.4.1. Import User#
To import user data, issue command:
> reactisl user import
You will be prompted for the name of the .csv file you wish to import. When importing
from a file, be sure to either place the file in the directory in which you issue the
import command or give the filename prefixed by a path relative to that directory. The
.csv file consists of one line for each user to be defined, with each line having four
comma-separated fields:
username,password,groups,batches
The groups and batches fields are themselves comma-separated lists (enclosed in double
quotes “) of group and batch names. The group names specify the groups the user belongs
to and the batch names list the batches the user is authorized to access. Either can be
empty to assign no groups or batches to the user; or they could be * to indicate all
groups or all batches. Note that if you use Excel to create the .csv file, you need not
include the double quotes around the list of group names or batch names because Excel
automatically adds them when a cell contains a comma-separated list and you save as a
.csv file.

Fig. 5.2 Example of a .csv file for importing user information.#
5.4.2. Import Group#
Groups can be imported from a .csv file using the following command:
> reactisl group import
You will be prompted for the name of the .csv file you wish to import. When importing a
file, be sure to either place the file in the directory in which you issue the import
command or give the filename prefixed by a path (either an absolute path or a path
relative to the directory in which you execute the import). The .csv file consists of
one line for each group to be defined, with each line having two fields:
groupname,batches
The batches field is itself a comma-separated list (enclosed in double quotes “) of
batch names that specify the batches that users in the group are authorized to access.
Batches can be empty to assign no batches to the group or can be * to indicate all all
batches are assigned to the group. Note that if you use Excel to create the .csv file,
you need not include the double quotes around the list of batch names because Excel
automatically adds them when a cell contains a comma-separated list.

Fig. 5.3 Example of a .csv file for importing group information.#
5.5. Accessing V2022 License Manger from Legacy Clients#
The V2022 version of the Reactis License Manager supports access control to licenses it
serves. Access control is configured by defining users and passwords for authentication
and by specifing which licenses each user is allowed to access. If this functionality is
not configured (no users.txt file exists), then the user authentication feature is
disabled. In this case, all users, including users of older Reactis clients,
automatically have access to all licenses.
If users have been created (access control is configured), then a user named “legacy” needs to be added in order to obtain licenses from legacy Reactis clients (those older than V2022). After the “legacy” user is created, batches and groups can be assigned to it just like any other user. The “legacy” user does not require a password.
5.6. Access Control Examples#
5.6.1. Small Team Example#
In this example, the company ACME Automotive has 4 users:
- John
Project leader who needs access to all products the company has purchased.
- Karen
Software Engineer who tests standalone C code and also uses legacy versions of Reactis.
- Greg
Software Architect who works with Simulink models that include Embedded MATLAB (requiring EML Plugin).
- Susan
Quality Assurance team member who tests Simulink models that contain S-Functions (requiring C Plugin) and Embedded MATLAB (requiring EML Plugin).
The group is small enough to only use batches and does not need to use groups. Below is a table to visualize how to configure the Reactis License Manager.
User |
Batches |
|---|---|
John |
\(*\) (all products) |
Karen |
r4c |
Greg |
r4sl,r4ep |
Susan |
r4sl,r4ep,r4cp |
The group has a budget for two floating licenses for each of the products to be used by the four team members. After acquiring the license file, the next step is to configure the Reactis License Manager to have a username and password for each team member, and to have the appropriate permissions set for each user. In the following, we employ optional arguments to each command in order to give all information within the command and skip the prompts. For example, we add a user with:
> reactisl user add john badpw1
instead of entering:
> reactisl user add
and then responding to the prompts for username and password. To complete the license manager configuration for ACME Automotive, do the following:
Create a license manager user and password for each team member.
> reactisl user add john badpw1
user john added
> reactisl user add karen badpw2
user karen added
> reactisl user add greg badpw3
user greg added
> reactisl user add susan badpw4
user susan added
After all the users are created, execute the list command “reactisl user list” to display the users

Fig. 5.4 Example of listing the users after created.#
Assign batches to each user. (Reminder that * gives a user access to all batches).
> reactisl user addbatch john *
Batch * added to user john.
> reactisl user addbatch karen r4c
Batch r4c added to user karen.
> reactisl user addbatch greg r4sl
Batch r4sl added to user greg.
> reactisl user addbatch greg r4ep
Batch r4ep added to user greg.
> reactisl user addbatch susan r4sl
... [also add r4cp and r4ep for susan]
After adding all of the batches to the appropriate users, the “reactisl user list” command shows how the users are assigned batches

Fig. 5.5 Example of listing users after batches are assigned.#
Notify users that their user id and temporary password are created. They can change their password by clicking the Change password button in either:
the License tab of any of the Reactis clients, or
the License Monitor
Since Karen uses legacy versions of Reactis for C, the user “legacy” must be created. Remember that there is no password for the “legacy” user. Finally assign batch r4c to the legacy user.
> reactisl user add legacy
User legacy added.
> reactisl user addbatch legacy r4c
Batch r4c added to user legacy.
After this configuration Karen (and anyone who can access the server on which the license manager is running) will be able to use older (pre-V2022) Reactis for C clients (without authentication). No licenses for Reactis for Simulink will be available to older clients since the r4sl batch was not added to the “legacy” user.
The team is ready to use Reactis!
5.6.2. Large Team Example#
In this example, the company Countdown2Launch(C2L) has a large team of engineers working to send their spacecraft to Jupiter. There are 20 Reactis users that will be using the shared floating licenses. There will be a team of controls engineers, a team of model-in-the-loop (MIL) testers, and a team of software-in-the-loop (SIL) testers. Some on the team will be assigned to the built-in admin group which enables them to disconnect idle users.
The following describes how to employ user groups to organize access to the different Reactis licenses used by the C2L team. The first step is to define the members of each group and which batches each group will need.
Group Name |
Batches |
Group Members |
|---|---|---|
controls |
\(*\) |
Ted, Jane, Jeff, Don, Dave, Rick, Pam, Donna |
miltest |
r4sl,r4ep,r4cp |
Will, Nancy, Melinda, Pete, Adam, Oscar |
siltest |
r4c |
Sally, Jen, Bill, Steve, Dan, Bob |
admin |
Ted, Sally, Will |
To configure the license manager for these groups, we will use the .csv file import
feature to define the users (create the users.txt file) and the groups (create the
groups.txt file). To avoid warnings, the groups should be created first and then the
users.

Fig. 5.6 Example of a .csv file to import group information.#
To import the .csv file to create the groups, execute the command:
> reactisl group import groupdefs.csv
After importing the file, use the command below to validate:
> reactisl group list

Fig. 5.7 Example of validating import of groups using list command.#
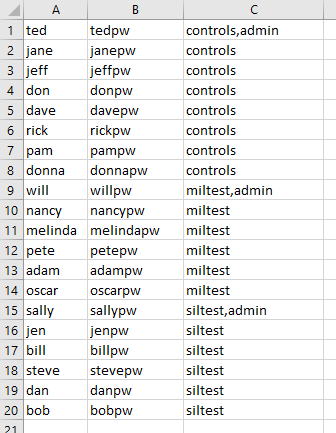
Now define the users in a .csv file with one row per user. Each row contains the
username, password, and groups the user is in. We use the convention that the initial
temporary password for each user is the username concatenated with “pw”.

Fig. 5.8 Example of .csv file to load user information.#
Next, execute the following to import the users:
> reactisl user import userdefs.csv
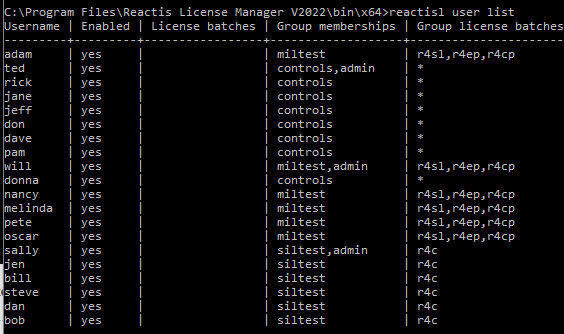
After loading the file, validate using the list command:
> reactisl user list

Fig. 5.9 Example of validating import of users using list command.#
The team is now ready to launch!
5.7. Command Quick Reference#
This section contains a summary of the command line utilities available for configuring access control for the Reactis License Manager. To issue these commands:
Open a Command Prompt (DOS) window in administrator mode. One way to do this is by typing
cmdin the Windows task bar search, then right-clicking on Command Prompt and selecting Run as administrator.Change the working directory in the Command Prompt Window to the license manager bin directory. The location of the bin directory is:
C:\Program Files\Reactis License Manager V2022\bin\x64
Note: User, Group, and Batch names cannot include the following characters: , ; : | \ / ‘ ” ` or whitespace.
In the following, arguments in square braces are optional. If not given on the command line, you will be prompted for them after issuing the command with the required parameters. If an optional argument is omitted, all subsequent arguments must be omitted, as indicated by the nesting of the square braces. For example, [username [password]] does not allow password to be specified if username is omitted.
Command |
Description |
|---|---|
reactisl user add [username [password]] |
add a user and create a password |
reactisl user remove [username] |
remove a user |
reactisl user passwd [password] |
change a password for a user |
reactisl user addgroup [username [groupname]] |
add a user to a group |
reactisl user rmgroup [username [groupname]] |
remove a user from a group |
reactisl user addbatch [username [batchname]] |
add a batch to a user |
reactisl user rmbatch [username [batchname]] |
remove a batch from a user |
reactisl user enable [username] |
enable a user |
reactisl user disable [username] |
disable a user |
reactisl user import [csvfilename] |
import a |
reactisl user list |
display user information |
reactisl group add [groupname] |
add a group |
reactisl group remove [groupname] |
remove a group |
reactisl group addbatch [groupname [batchname]] |
add a batch to a group |
reactisl group rmbatch [groupname [batchname]] |
remove a batch from a group |
reactisl group import [csvfilename] |
import a |
reactisl group list |
display group information |
